Preparing My Assets & Nanite
- Mikey Owen
- Dec 3, 2022
- 11 min read

Now that I've completed my research phase for this assignment, I wanted to move forward with pre-production and discuss the implementation of my photogrammetry assets.
In this post; I'd first like to discuss the Nanite feature of Unreal Engine 5, before then moving onto a brief showcase of my photogrammetry assets and brainstorming how I'll use them for the final deliverable.
Nanite
Regardless of the workflow optimization I developed in assignment 1, I'll be taking a different approach for this assignment. This is because a large part of the first assignment was dedicated to the decimation and re-topology of the meshes, which no matter how slight, always resulted in a depreciation of quality for the final result.
Lowering the poly-count of any model will always lower the detail, no matter how slight, but the meshes produced in 3DF Zephyr were far too condensed to be realistically brought into any scene creation software. However this view quickly changed after exploring the facilities of Unreal Engine 5's (which is the engine I am specifically required to use for this assignment) implementation of 'Nanite'.
To put it briefly; Nanite allows me to bring in the original mesh outputs, unaltered, with hundreds of thousands of polygons, and not have it affect the optimization of my final scene. It works to only render the detail that the camera is seeing, rather than the entire scene regardless of viewpoint. It's a real game changer for CG artists, and I'm incredibly excited to see how much of a difference it can make to my final scene!

Before that though, it's important to research Nanite so that I can make the most of Unreal Engine 5's facilities available to me. To that end, I've discovered this document here which does a great job of summing up this new technology; how it works, and how it can change the amount of detail in my scene without affecting the overall quality.
I skim-read the 155 page PDF, but needless to say it's left me very excited about the prospect of applying Nanite to my workflow! However for further information I also obtained this video guide to the facility from Unreal themselves:
Lastly, I wanted to obtain some tutorial reference for how to actually enable this facility, I therefore located this short video (the length of the video is really a testament to how easy it is to implement) which shows exactly that!
I really can't overstate what a revolution this facility has been to my workflow and how excited I am to test it's capabilities with my temple environment. It's also worth noting that recent updates to Unreal Engine have even made Nanite compatible with foliage! Foliage in particular was something which caused me no end of optimization related headaches for my project last year, so this truly is a god-send!
The Assets
Now that I've established my reason for doing so above, I took my photogrammetry meshes back to the drawing board and remade them all within 3DF Zephyr (aside from the Lidar scans of course, as these were made separately in Scaniverse).
Additionally, In the previous assignment; my approach to the meshes was to showcase them individually, rather than have them be part of a scene. So the cleaning process of my initial approach in particular was far more relaxed, aiming to keep parts of the surrounding terrain as part of the mesh to give them a 'plinth' of sorts to be presented on. Given that for this assignment however, they will be part of a much bigger scene, I also wanted to approach this part of the workflow differently and remove much more of the surrounding geometry.
So, to summarize this new approach: The original photos were run through 3DF Zephyr again, aiming for a high level of detail (as this wouldn't need to be lowered due to Nanite), then the surrounding geometry was cut away so only the assets themselves were part of the final meshes.
With the above in mind, I've included a gallery below of all 16 of the new photogrammetry meshes I've created that are available to be used as part of my temple scene (once again taken as screen-captures from a 3DS Maya viewport for consistency):


As you can see from the gallery above, there's a wide variety of assets available to me, and I certainly plan to use as many of them as possible! But I do need to remember they should never feel 'shoe-horned' in, they have to make sense to my environment, but also need to be the main focus of my short cinematic.
I'd like to therefore break them down individually and brainstorm some ideas on how they could be used, or indeed ultimately decide whether certain ones should not be included. To do this, I'll first separate them into different categories as dictated by the capture methods I used.
Lidar Scans
As I mentioned in the previous assignment; the Lidar scans make up almost half of the total and I wasn't particularly impressed with the quality. However, after the discovery of Nanite, and given that they include the largest 'set-piece' areas of geometry, I believe I can make them work effectively!
In this section I'd like to go through the scans one by one, discussing where I could possibly implement them into the temple scene, or whether I feel it's best just to simply not use them:

I think it's rather obvious where this scan could be implemented: the entrance to the temple. The entrance itself will naturally be the focus of the opening shot, so it makes sense to place one of my scans here, and none of the others would make as fitting an entrance as this one!

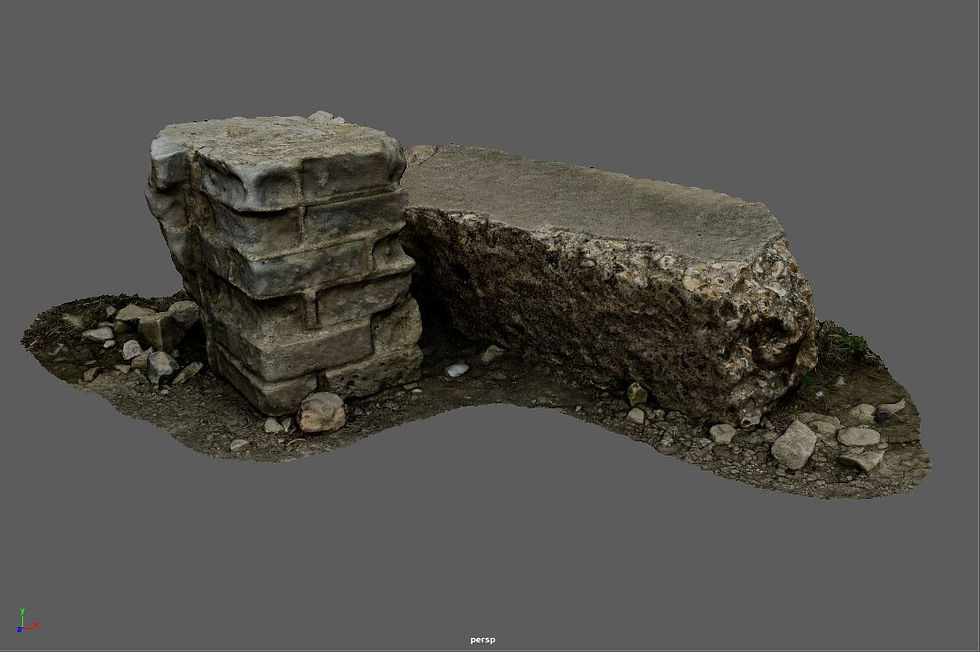
Given that I do also have a scan of the same pillar available from the photogrammetry list (and it's better quality too), I probably will not use this pillar. However, if I could potentially have a multitude of them holding up the inner layers of the temple, in which case having as many assets of these pillars as possible will be beneficial!

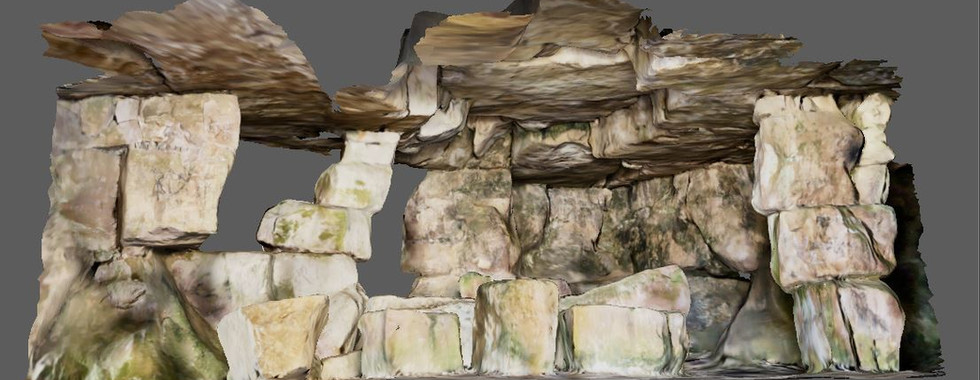
While I do have issues with this scan (the ceiling in particular), it features so many different rocks of various sizes that there will absolutely be some way to include it! I could either take the main body of this structure to use as scene decoration, or chop parts of it up and place them throughout the environment. Their sizes could even be altered to act as walls or pillars of their own!

In a similar way to the above cluster, there's such a large surface to this scan that the options are incredibly open for how I could use it within the scene. It could be used as it's namesake, a wall for the interior, or even along the outside of the cave etc. It could even be rotated to act as flooring or ceiling should I wish to do so!

I'll be honest, this is the scan which disappointing me the most. I originally imagined it would work perfectly to add some ambiance to my scene. Unfortunately the baking of the light onto the textures creates issues. Like the above scans though, the multitude of surfaces on offer in this scan could all be chopped out and repurposed in some way as scene decoration!

This rock cluster will work wonderfully for my scene regardless of it's placement. It's beautifully random and natural, and could be used as scene dressing either outside the entrance to indicate the instability of the rocks, or on the interior to indicate a similar effect! I will absolutely use this in my final scene.
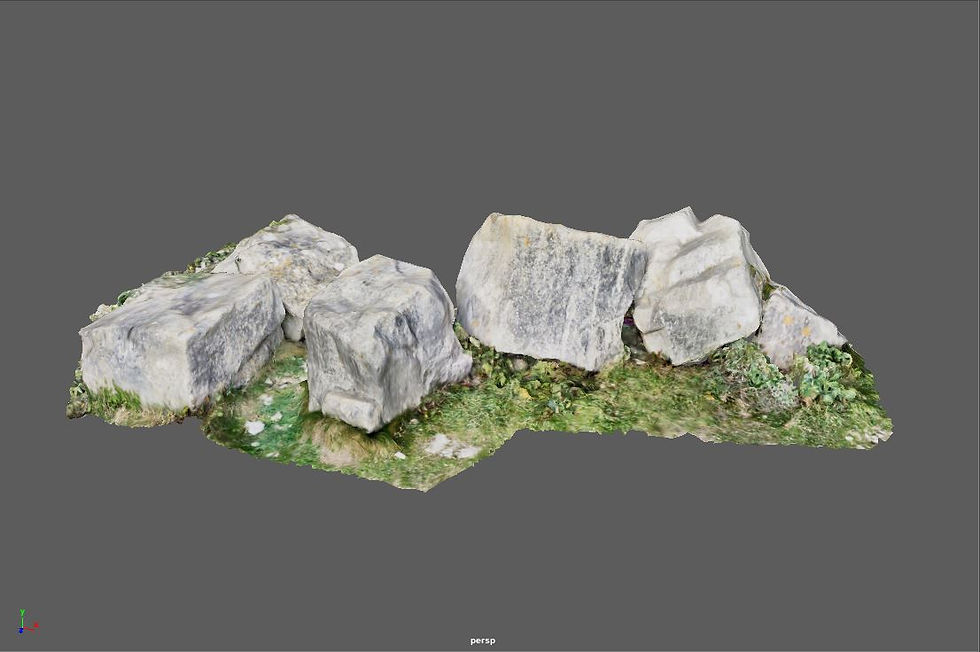
In the same way as the above cluster, this asset will absolutely be adopted into my final scene. I have a vision of a small island in a lake where my sword will be located with the light shining down upon it. As this will be the only section of the cave that gets any sunlight, I imagine this will be grassy, so any assets featuring grass and a realistic blending with it will be imperative here.
That brings me to the end of my selection of lidar scans. As you can see, it's a rather mixed bag, but I'm optimistic that I'll be able to use each of them in some way for my final environment, without them feeling like they've been included for the sake of ticking boxes. Now we'll move onto the photogrammetry meshes.
DSLR Camera Photogrammetry
The photogrammetry assets were also a rather mixed bag unfortunately. They are a lot better in terms of overall quality, but given that they were taken from a quarry, I do worry that there's a few I'll be unable to use without cementing my environment in a certain time period which wouldn't line up with my medieval idea.
However, as I said above the quality is definitely an improvement. So I'm sure I'll find some way to implement the majority into the scene. As I did with the lidar scans, I'd like to break them down individually and establish how I could use them, starting with those taken with the College's DSLR camera:

This is certainly a good one to start with! I saw this carving of a face on one of the rock faces outside the caves and knew it would make a great feature for part of my temple environment. I could potentially scale this up to create a towering figure, or have a waterfall cascading down from it's mouth. There's a lot of potential here.

This is another asset which I can absolutely use! I think it would work wonderfully for linking up the cave entrance to the surrounding terrain, especially given as it's the same rock type as that asset (a worry which I have going into this project, as I don't want mismatching rock types unless it makes sense geographically). Either that or it could be placed in the interior to break up the rock-laden floor.

There's not much that can really be said about this asset. My thinking when capturing it was that I needed plenty of rocks for scene dressing, and I believe it would perfectly as exactly that. The terrain around it and baked lighting may cause some issues, but I'm sure this could be placed in a multitude of areas around my scene and not look out of place.

Exactly the same as the above asset, this is a simple rock which was the star of my previous assignment. I have no doubt that this could be placed in a variety of areas, and the grass crawling up the sides of it will work wonderfully with blending it into the scene!
That brings us to the end of the DSLR camera captures. All that remains now is the assets captured on my phone camera, but despite my concerns at the beginning of this section I believe I've already got a great asset library ready for this environment!
Phone Camera Captures
Moving onto the captures taken with the camera of my Google Pixel 4a, I am beginning to feel more and more confident about my final temple environment. We've got a good asset library to work with as it is, so at this point any additional assets are just gravy!
I do have issues with one or two of them, which I'll discuss below in the same format as I've applied to the previous two sections; breaking them down one and a time and discussing how they may be used within my scene:
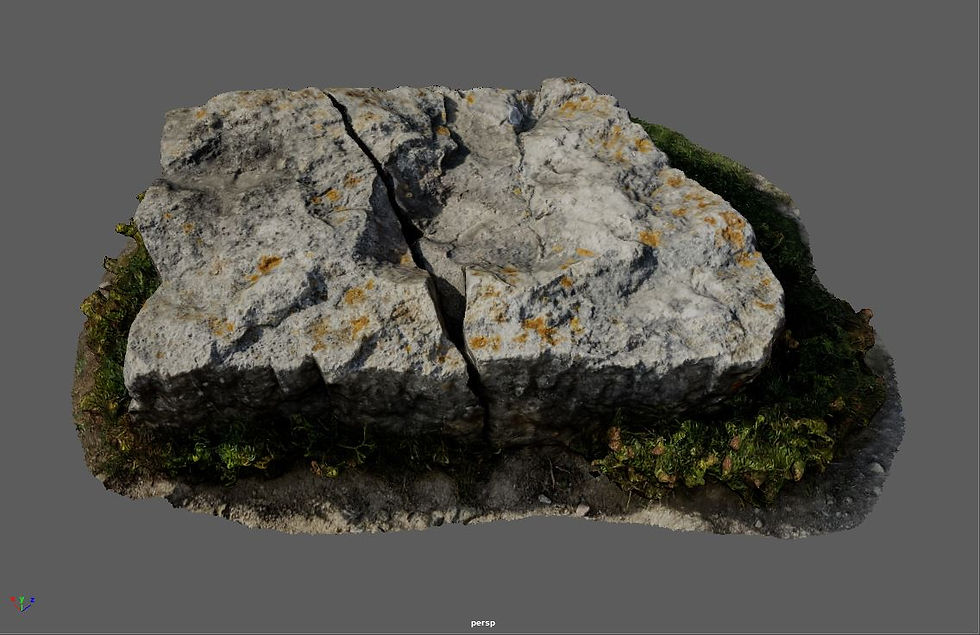
This asset will be the star of the show! I know I'll need my sword to be placed within a stone to fit the narrative, and where better to insert it than into a rock with a crack already split across it! I may run into some issues with the baked lighting, but I'm sure that can be rectified by ensuring it matches the dynamic lighting of the scene when placed.

The naming of this asset should really acknowledge the nonchalant thinking I had when capturing it. I once again went with the ideology of capturing as many rocks as possible for scene dressing, and this one stood out to my due it's unique shape. I feel this rock would work great as part of the interior due to it's baked lighting, and because it is shaped differently from all angles it could be used multiple times!

Just as I said regarding the pillar scan in the lidar section of this post; I do feel this pillar asset has a lot more detail so will most likely use this over the lidar scan if I had to choose. However I'm beginning to come around to the idea of having multiple pillars holding up the ceiling, so will undoubtedly use this asset for exactly that in the final scene!

Now this asset is a tricky one. If I place it within the scene, that implies human presence. However, in doing exactly that I could be adding an ulterior narrative to my scene. I'm a huge fan of environmental story-telling, and placing an abandoned campfire outside of the temple could be great for implying it's discovery, which results in the cinematic I'm now producing!
Now we come to the asset I've been most worried about. Placing this within my scene will imply the presence of modern human structures, though if I evolve my narrative in ways I mentioned for the campfire asset, this may actually heighten that rather than destroy it. I remain unsure about the implementation of this asset, as it's placement would require the inclusion of more brick structures to avoid it looking out of place.
We've now reached the end of the asset library available to me! I'm incredibly excited to begin placing these within my scene and building my temple environment. But before I can do so, it's worth mentioning one more asset source I'll be implementing for my scene.
Existing Assets & Megascans Library
Whilst the plethora of assets I have available could make a convincing environment on their own, it's still imperative that I seek out some additional assets to supplement them and build on their foundation.
To that end I've explored asset packs available on the Unreal Marketplace, and actually obtained some wonderful scenes through a recent Humble Bundle package which I think will really enhance my scene!
I'd like to include some screenshots of these asset packs below, along with a brief description of them and how I feel they could enhance my final environment:

The first of which is the Fantasy Forest pack from Sidearm Studios - a link to the marketplace page which contains more screenshots can be found here.
Considering my desire to set my temple in an English country side (given my story in the previous post about King Arthur's Cave), I think this environment is already full of wonderful assets I could re-purpose into my scene (giant mushrooms aside of course).
I think using the terrain and trees in particular will add a level of depth and dynamic realism to my scene which would be impossible to achieve with the assets I currently have.

The next is the Ancient Temple pack, also created by Sidearm Studios - a link to the marketplace page which contains more screenshots can be found here.
I feel the ways in which I can utilize this environment and it's assets are quite obvious. I'm building an ancient temple, and this pack is literally named 'Ancient Temple'... Though I'll admit, as much as I love it, the large elephant mural is perhaps a bit much and wouldn't fit my narrative plan. However, the rocks, the foliage, the tiled flooring etc would all be wonderful additions to my scene that could really help tie my assets together and add a new layer of authenticity to the environment!

Lastly we have the Ancient Ruins pack, once again created by Sidearm Studios - a link to the marketplace page which contains more screenshots can be found here.
My thinking for the inclusion of this pack's assets go back to the brick photogrammetry mesh detailed earlier in this post. A temple by definition is a man-made structure, so whilst I liked the original idea of a natural wonder housing a legendary sword, it doesn't really fit the brief. To that end, I think the assets included in this pack will really help cement my temple environment as an ancient human creation which has been lying dormant for hundreds of years.
The pillars, archways and columns included here will do great for supplementing the pillar photogrammetry meshes to hold up the ceiling. They could even be lain down across the floor, or propped up next to the entrance to add an additional layer of environmental storytelling!
Megascans
Lastly I'd like to quickly discuss how I intend to use Quixel Megascan assets to supplement those I've detailed above. A link to Quixel's megascans asset library website can be found here. Quixel Megascans are a collection of photorealistic photogrammetry assets which are actually available via a plugin built into Unreal Engine 5!
There's a plethora of meshes available from a huge variety of structures and locations around the world, including rock formations and ancient temples! All I need to do is simply open the Quixel Bridge plug-in from within the engine, then download the assets I want from a list and they'll be added to my scene library completely for free. I've included a screenshot of a few of the hundreds of assets available to me to highlight their versatility:

As you can see from the screenshot above, there really is no shortage of assets available to me! I'm excited to take a deep dive into megascans to 'fill the gaps' left in my scene once I've exhausted all my photogrammetry and marketplace assets.
Now we've reached the end of this post! Needless to say I think I've built quite a collection of assets and feel very confident about my final temple environment.
I can now move onto planning out my actual cinematic in the next post. Starting with a script and shot plan, before moving onto storyboard construction and previsualization of my final cinematic ready for construction!


Comments