Completing Pre-Production
- Mikey Owen
- Apr 4, 2024
- 5 min read

With my final research areas now complete; I felt confident in proceeding to the final stages of my pre-production phase. All that remains is to finalize my storyboard (using the skills and terms established from my camera research), produce an audio track to sync the whole thing to, & finally create a 3D pre-visualization using the storyboard as a base. Once these steps are completed, I'll be able to move onto the production phase of my final project!
Finalizing the Storyboard
As you know from my previous post on the Storyboard creation; I created the panels and established some rough camera angle plans, but never finalized them nor set how long each scene would last for before a change of shot. I therefore went back to my storyboard panels using the refreshed knowledge I'd gained from my camera research and created the following final storyboard:


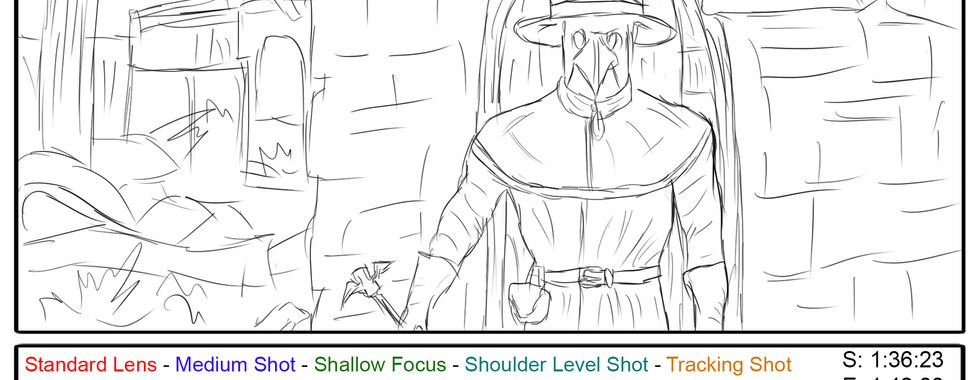


As you can see from the finished panels, I've made quite a few additions. I'll attempt to break down exactly what each section of the text indicates below:
S, E & number: These are quite simply the starting and end frame for the shot, as well as the number of the scene out of the 14 total.
Black text: This is a rough description of what exactly happens on screen during the shot. VFX that will be added during production, audio examples, background motion that will be added etc.
Red text: This dictates the kind of lens that will be used for the duration of the shot.
Blue text: This dictates the camera shot type, or alternately the shot size.
Green text: This text indicates the type of camera focus that will be employed for the shot.
Lighter Blue text: This text states the camera angle that will be used for the shot.
Orange text: This describes the camera movement that will take place for the shot.
With that, my storyboard is now complete. This is a vital stage of pre-production, and I'm looking forward to building upon it to create a pre-visulization and, ultimately, my final project animation. For now though; I need to move onto the creation of some base audio for my narrative to sync my camera shots to.
Creating a Simple Audio Track
I now needed to create a basic audio track to sync my pre-visulization to, and eventually build upon to create the audio for my final production. I knew exactly where I needed to start though; with my narration script I'd created at my project's inception.
I used my home microphone (a Blue Yeti Pro I've had for a few years) and a free audio manipulation program called Audacity (https://www.audacityteam.org/download/) to record myself narrating the script in full. From there I cut out any background audio and plosives using compression, equalizers and wave form manipulation. I then added a subtle echo & reverb to the track, as if it was being read in a large chapel, as this would fit my idea of the narration being an account of a holy representative who visited the region.
With the narration recorded, I still felt it was missing something to tie it all together: music. I will eventually use a custom produced track as I have in the past, but for now I took to YouTube to locate a simple instrumental track which would match the theme of my narrative. I located this wonderful piece of piano-led music called 'Bloodline' by Secession Studios which worked perfectly! I've embedded the video below for your reference:
Now that I'd found a fitting soundtrack, I added the song to the background of my narration, and voila! A simple audio track that provided me with something to match my pre-visualization shots to and to enhance the mood of my narrative. I'm really pleased with the final result, but unfortunately cannot add it to this section as I appear to be unable to add raw audio files to this post. It will at least be included as part of the pre-visualization which I'll be moving onto now to complete my pre-production phase!
Creating a Pre-Visualization
Now I can finally move onto the last stage of pre-production for my project; the pre-visualization. This is essentially an animated version of my storyboard created in 3D space, it's purpose being that I can finalize all my camera properties ahead of adding in my final assets (environment and characters).
I've made plenty of pre-visualizations during my time on this course, but this was by far the easiest. That's not to see it's the most simple of my productions up until now, more that I felt the most prepared for it. I have a clear picture of how I want my animation to flow, and with my research refresh in the previous post, I had the terminology and plenty of new tricks available to me.
I set to work creating a basic 3D layout of my Melcombe Regis, adding buildings & trees, a ship and dock for the opening etc. until I was ready to go. From there I decided I would use the sample mannequins and animations that are part of 'third person game' template in Unreal Engine as my actors. I placed them in their respective locations, added my cameras (tuning their settings as per my storyboard) and added the sequencers for each of my shots.
Aside from a few more scene objects to add and key-framing of the shots, it really was that simple! I'm actually really pleased with the final result. Pre-visualizations in the past have often, I'm ashamed to say, felt unnecessary as I wanted to simply move onto the final animation as quickly as possible. But in this case, I found this extremely beneficial. A few shots have changed, I feel for the better, and I discovered that certain camera placements wouldn't work.
For example, when the doctor opens the door of the dying man's house, the camera originally was placed level with the doctor's chest to capture the shadow in full. However, when I came to reproducing this shot, obviously the door swung open and blocked off the entirety of the shot for a few frames. Call me a perfectionist, but this couldn't do. I instead moved the camera above the door and altered the focus distance of the lens to cut this opening door out of the shot, and I think this change actually works much better!
Either way, I feel I'd rather show than tell at this point, as despite what I've just claimed above, I am still very keen to move onto the production phase ASAP! I've therefore included the pre-visualization below, along with the audio track I created in the previous section of this post:
As I said, I'm really happy with how this has turned out. Out of all the CGI projects I've created as part of my journey, I feel this is the one I am the most prepared for (in terms of pre-production). This will, I'm sure, lead to a much better final project submission than if I had simply done the bear minimum and moved onto production.
I'm excited to find out if there's any merit to that, so now let's can move onto the production phase in the next post!


Comments