Creating A Previs & My Environment
- Mikey Owen
- Feb 8, 2023
- 8 min read

Now that I've finished my research (to the extent that I know the kind of environment & effects I'll be creating), It's time to complete the final stages of pre-production.
In this post, I'll be starting out with creating my 3D blockout of my environment. From there I can mess with lighting options to establish the optimum solution for my scene, and then render a previs animation. This previs will allow me to experiment with my camera types/shots/movements ahead of the final animation, and establish which shots work best for showcasing my environment.
3D Blockout
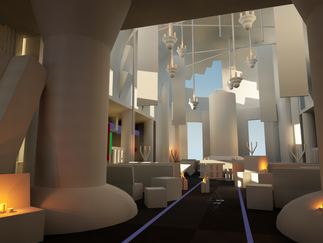
To create the block out of my scene, I first opened a new Unreal Engine 5 level file and, using my concept picture as a base, began to place standard primitives (cubes, spheres & cylinders) to 'block out' how I envisioned the final environment to look. This was a fairly straight forward process, and I think I've managed to achieve quite a good likeness to my original concept.
Once all the geometry was in place, I then added low-intensity directional lights and emissive materials to act as the effect's lighting within my scene. Knowing where the effects would be viewable in the final cinematic would help greatly with my previs camera placement.
As I said, I'm fairly pleased with the overall effect of this block out environment. It's allowed me to formulate a solid plan for the aesthetic of the final scene, and has left me really excited to begin construction with the final assets! I've included a screenshot below of the blocked out environment for your reference:

With the environment now blocked out and the effects given placeholder visuals to help with framing, I now needed to work on lighting solutions before I could construct my previs.
Establishing Lighting
I wanted to have my lighting all finalized before I moved onto final asset environment construction, but unfortunately hadn't anticipated just how much of my scene lighting would rely on the final effects. I attempted to replicate this with directional lights and emissive materials (as discussed in the above section), but without the final effects' lighting, I was limited to only really being able to manipulate the sun/moon positioning and time of day at this stage.
For the sky and weather system (as I decided nailing down the rain for my final cinematic at this stage was probably a good idea!) I used an Unreal marketplace asset called Ultra Dynamic Sky (a link to the store page can be found here). This intuitive add-on gave me access to dynamic sky and weather blueprints that I could drag and drop into my scene. From here I could manually adjust things like time of day, moon/sun position & size, cloud coverage, weather (including rain, dust and snow), overall lighting intensity etc. A lot of options to impact my scene lighting.
I conducted some experiments, by way of screenshots, to establish which scene lighting option worked best for my level. I've included these all in a gallery below for your reference:


Even though the obvious contender for showcasing the environment would be the 1st image (clear skies, daylight lighting), I actually much prefer the moody atmosphere of the night time images. This assignment is about showcasing the VFX, not the environment, and I feel having a dark scene would really draw the audience's eyes to any change in light sources (so the fire, water, sparks etc). Additionally, the aesthetic of the environment lends itself to a much darker scene, it's far more in-keeping with my original concept.
While it may not be clear from the still frames, the thunderstorm actually has been the clear winner for me based on the reasons I discussed above. The moonlight shining through the whole in the ceiling does provide a great visual and some nice dynamic lighting, but believe me, the thunder lighting up the church interior when it cracks in the distance is a far better effect! I have included these flashes in the previs animation, so that can be seen in the next section.
Creating the Previs Animation
With my environment blocked out and lighting (for previs purposes) in place, I could move onto rendering out a previs animation.
I decided to condense my cinematic into four 15 second shots. These would take place from key angles within the environment that would showcase all the effects in action. I've broken these down below with my reasoning for each:

I began with a nice establishing shot of the environment as a whole. It very much mimics the camera angle of my concept art, as I really feel this angle works as a brilliant showcase for the scene. I've used a low zoom and small aperture for this camera (12mm and 1.2 respectively), as I wanted to capture as much of the scene in ass much clarity as possible.
I did experiment with depth of field application, but honestly it muddied too many details that I'm keen to show. Additionally, I need to remember that there will be some floor-level mist present in the final sequence which will add depth to the scene.
The camera will slowly dolly forwards, rotating round slightly to the right to display more of the scene as the camera's field of view moves beyond the two framing pillars.

The second shot focuses on some of the electrical equipment around the environment, in particular the power cables flowing across the ceiling and this small conduit on a central pillar.
Here I positioned the camera much further back and used a higher lens zoom (around 35mm) to try and frame the shots so that all the necessary objects were visible, but the audience couldn't be distracted by surrounding geometry. The camera will then slowly move downwards, but have it's focal point remain aligned with the pillar conduit as it sparks away.

For the 3rd shot we now see the opposite side of the cathedral, with another conduit visible and several electrical panels visible beyond the fencework. These will all be sparking and throwing off small bolts of electricity.
I opted to place the camera next the statue so that the shot would also capture one of the skulls that lines the base, and then set the camera to a dutch angle to imply an unhinged nature to the environment. I think this angle works extremely effectively with the context of the skull and the lighting flashing in through the windows! In terms of zoom and aperture I once again used a very small value for both (12mm and 1.2) to capture as much of the environment as possible, with as much clarity as possible, so that details like the power lines above the door would be easily visible.
The camera continues to tilt as it moves slowly forward, making the environment look ever more sinister while the lighting briefly illuminates the interior.

The final shot of the previs will focus on the water effects. Here the camera is placed above the whole in the ceiling, capturing the rain illuminated by the lighting, and watching the water wash down over the statue before collecting among the debris on the floor.
I'm really happy with this shot, and I think it's going to work incredibly effectively in the final animation. I've opted for a much larger zoom on this shot (50mm with a larger aperture of 10) to capture the water in as much detail as possible, and even a slight depth of field to keep the shot focused on the water effects.
The camera will continue to track the water as it moves down the statue closer to the ground, while also rotating into a dutch angle of sorts as it gets closer to the ground and reveals a full view of the cathedral interior beyond.
With the cameras now In place, I could finally create my previs animation. I actually opted to create two versions of this previs, due to my previous experience with Adobe After Effects. Because After Effects would have to use camera tracking for the placement of VFX that move with the camera, I felt it would also be better to render a secondary animation with no camera movement whatsoever. This way I would be able to add my effects with no tracking necessary, 'flatten' the sequence to embed them within it, then manually add my camera movements within post production. It's my hope that because I'll be rendering my sequence in such a high quality that any compression resulted from manual zooming will be negligible.
Either way, we'll see how that works out later in the assignment (plus I'll still have the renders with a moving camera as well so I can attempt tracking to compare the two), but for now I've included both of my rendered previs animations below for your reference:
Previs (Static Cameras)
Previs (Moving Cameras)
Obviously it should go without saying that I feel the animation with the moving cameras is far more effective at showcasing the environment and effects, however I'm hoping my foresight here will make the use of After Effects far easier in the long run.
Either way, that brings me to end of my previs creation! I now have my lighting & cameras finalized and ready for the cinematic. All that remains before creating my effects and ultimately the final animation, is swapping out this 3D block out environment for the real thing!
Creating My Final Environment
I could now set to work swapping out my 3D block-out primitives with actual assets to create my final scene. I was allowed to use pre-existing assets for this assignment, so began compiling Unreal Marketplace items that I could use to assemble the church. I've listed all the asset packs I used, along with a link to their store page on the Unreal Marketplace, below:
Cathedral Of The Dead by Sidearm Studios (store page link here) - The assets from this pack will make up the main bulk of my church. It features all the walls, altar, stained glass windows, benches, candles & even the large statue I implemented in my concept art!
Modular Dungeon Kit by Sidearm Studios (store page link here) - These are some additional Gothic architecture assets that I'll use to supplement the ones in the above pack, like more pillars, statues and the like. It also features some great chains and large lamps that I can hang from the ceiling to match my concept.
Modular SciFi Season 1 Starter Bundle by Jonathon Frederick (store page link here) - I believe there's plenty of assets in the first two bundles to complete the Gothic portion of my genre blend, but now I need some sci-fi assets to complete the other half. This pack contains some great futuristic flooring, walls and panels that I can use to add some sci-fi flair to my overall structure.
Modular SciFi Season 2 Starter Bundle by Jonathon Frederick (store page link here) - Another bundle in a similar vein to the first, but this one focuses mainly on props. Featuring a collection of wiring, cloth, crates, panels, lights and plenty more, I'll scatter these around my environment to ground this Gothic building in a futuristic environment.
Polar Sci-Fi Facility by 3D Brushwork (store page link here) - This bundle is essentially there to fill any gaps. I don't want to overuse the same props by restricting myself to the above bundle, so this pack comes full of machinery and generators that I can mix in with them.
With the above asset packs loaded into my previs scene, I'm confident that I can produce a high quality environment up to the standards of my concept!
In terms of creating the environment, it was unfortunately not as simple as drag and drop to replace my previs block-out geometry. There was a lot of scaling mismatches, so I had to break apart blue-printed meshes into their separate components in order to resize them. The stained glass material for the windows unfortunately didn't come equipped with refraction values so light sources do pass through them, but don't actually brighten the stained glass texture. I did have to get rather creative with prop placement in order to fill gaps in the geometry and prevent unwanted light spilling into the scene, but I digress. The environment is finished!
I'm actually really pleased with how it turned out. It has been nice to experiment creatively by taking two distinctly different groups of architecture and props, then combining them to create an environment that looks natural. I've included a screenshot gallery below of the final scene for your reference (bear in mind the scene lighting is set to bright daylight so the assets can be seen, as the dynamic lighting from the candles and sparks won't be added till later):


There we have it! Admittedly this is quite a brief section for something which took several days of construction, but I don't want to over explain environment creation when this assignment is based on the VFX element. Speaking of which, now that I've got my final environment built, I can move onto the creation of my visual effects in the next post.


Comments