Finalizing My Script, Collecting My Assets & Constructing a Previs
- Mikey Owen
- May 9, 2024
- 15 min read

In the post I aim to complete the pre-production process and get my project file ready for VCAM capture! In order to do this I'll need to break this post down into 3 stages: finalizing the script I wrote at the end of the last post, collecting assets and producing a pre-visualization.
Finalizing the Script
Whilst I'm confident in the script I've created, and am happy to proceed forward with the general direction of the shots, there's a few things that I still need to establish. Whilst I know the camera movements themselves will be controlled by me using VCAM, the actual shot types and camera lenses I'll be using have yet to be confirmed. The actual usage of VCAM is something I've only theorized at present, so it would be great to nail down exactly how I intend to use this feature ready for when I come to capturing it.
To that end, I've brought the script from the previous post in below as a refresher, whilst also detailing the shot type, lens and VCAM usage respectively for each one:
Fade in to see the survivor will be seen from a distance searching through some boxes for supplies - Establishing Shot - Wide-angle lens (24mm – 35mm focal length) - VCAM usage won't be obvious here. I'll simply be using it to add some more human-like subtle movements to the camera so it doesn't look as artificial.
A creature runs quickly past the camera which is in the background of the survivor's location, just out of their view - Low Angle Shot - Standard lens (35mm – 70mm focal length) - VCAM will be used to apply 'camera shake' as the creature runs past the lens. This should indicate it's imposing speed and size to the audience.
The survivor looks up away from the boxes after hearing the noise of the creature running and scans the environment - Medium/Over The Shoulder Shot - Standard lens (35mm – 70mm focal length) - VCAM will be used here to sync with the motion of the survivor's head as they turn to look around the environment.
Monster comes into view from behind as they sit on a perch looking at the survivor in the distance - Over the Shoulder/Wide Shot - Wide-angle lens (24mm – 35mm focal length) - VCAM usage will also not be obvious here. There'll be a slight 'shake' to mirror the steps of the monster, but as with the first shot, it will mainly be subtle human movements to avoid the shot feeling artificial.
The survivor senses the danger and hides - Medium Shot - Standard lens (35mm – 70mm focal length) - VCAM will be used to mimic the movements of the survivor as they frantically hide, this will allow the audience to feel their fear as they struggle to avoid the danger.
The monster is seen clearly as they imposingly, but slowly, walk towards the survivor's hiding place - Full Shot - Standard lens (35mm – 70mm focal length) - VCAM will be used in a similar way to other ones featuring the monster. The camera will 'shake' with each step of the monster. I also intend to have it 'roar' so this is where a lot of camera shake will occur to heighten how imposing the creature is.
Shot from the monster's point of view as they check the survivor's hiding place but discover it empty before fading to black - Point of View Shot - Wide-angle lens (24mm – 35mm focal length) - This will create distortion on the edges of the frames to mimic the monster's alien eyesight - VCAM will be used to mirror the monster's head movements and subtle changes in position. This would be nigh on impossible using a regular cinecam actor without looking far too artificial.
Fade in to the survivor in a new location having fled the monster. They are seen running and coming to a stop while trying to catch their breath - Low Shot Dutch Angle - Standard lens (35mm – 70mm focal length) - VCAM will be used to mimic the steps of the survivor as they come to a stop, slightly rotating around to reveal the room as the survivor turns their head to do the same.
The survivor spots a chair and takes a seat, exhausted from their retreat - Medium Shot Dutch Angle - Standard lens (35mm – 70mm focal length) - VCAM will be used to 'drop' with the survivor as they collapse onto the seat. This will allow the audience to feel their exhaustion as the camera moves with them.
The survivor is seen from the front taking a breather while something stirs behind them. The creature we see rising in the background takes a second before lunging at the survivor and the scene cuts to black - Close Up Shot - Standard lens (35mm – 70mm focal length) - VCAM will be used in a multitude of ways for this shot, slowly stepping towards the survivor, just like the danger slightly out of view. When the creature ultimately attacks, a large amount of camera shaking will be applied to mirror the survivor's frantic attempts to escape.
That brings us to the end of my final script. I'm really confident in this idea and think, if VCAM is utilized correctly, this could be a really strong narrative! I also want to point out the continued usefulness of my camera refresh post (under Project 3 posts) as it's reminded me of a lot of shot types and angles I can use to really heighten this piece! The dutch angles in particular I think will be really effective and conveying to the audience that, even though the survivor feels he's safe in the penultimate shots, this location is possibly more dangerous than the previous one!
Now that I have a script finalized and ready for production; it's time to turn my attention to collecting some environmental assets ready for the final production!
Building My Environment
For the construction of my environment I already had a few asset packs in mind. In keeping with my theme of a post-apocalyptic world, reclaimed by nature, but also full of unknown alien growths, I had already done some searching in anticipation and found these:
An 'Alien Tendrils' pack by AssetKit, link can be found here. This pack contains a wide variety of alien tentacles that I can place around my scene, perfectly matching some of my reference images of the Flood parasite from the Halo series! I've included a screenshot below of some of the assets for your reference:

As well as these alien props, I still needed a basic structure. Sticking with the post-apocalyptic theme, I was able to locate an asset pack called 'Post Apocalyptic District' by KK Design. A link to it can be found here.
This pack contains a wide variety of vegetation, buildings, props like destroyed vehicles and furniture, as well as much more! It was perfect for constructing a basic post-apocalyptic suburb to house my animation in. I've included a screenshot showcasing some of the assets by the developer below:

I'm feeling confident with what I've compiled so far, but wanted some more of the bio-horror that I'd spent so long researching. The tendrils were great, but I fear that they alone wouldn't sell that this version of Earth was suffering to an alien/insectoid infestation. To that end I also located an asset pack called 'SICKA BIO HORROR 2' by SICKA. A link to this can be found here.
This asset pack contains a multitude of gory growths that I can place around my scene, as well as some human/infected corpses reminiscent of the 'Clickers' from The Last of Us game series that was such a huge influence on this animations' design. I'm sure I'll be able to use these to great effect in tandem with the other packs, and have included an image below showcasing the assets for your reference:

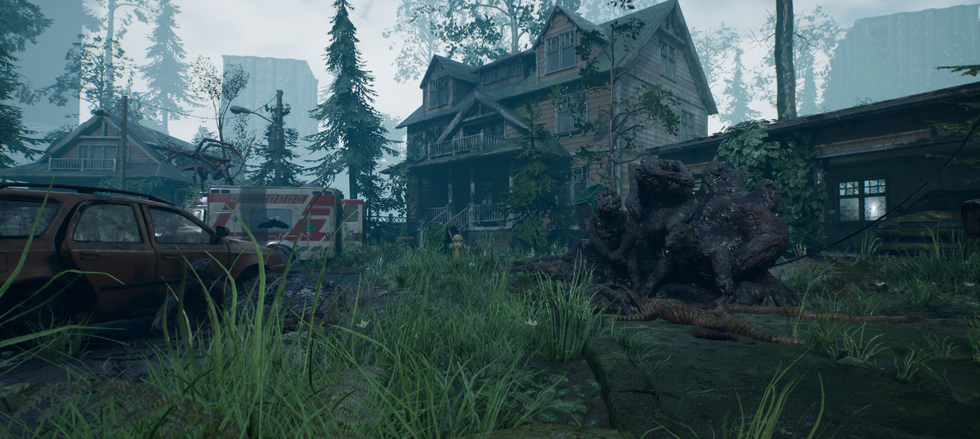
With the above asset packs to hand, I created a new Unreal Engine scene and added them all into my content browser. I then, over several days, began to build up a small cul-de-sac full of decayed buildings, alien tendrils and bio horror.
I'm really pleased with the turnout of this environment, and think it's one of the strongest ones that I've created during my CGI journey. I even made sure to pay particular attention to the lighting, ensuring it matched the mood and colour pallet produced during the last blog post by way of setting the colour hue to a cyan shade and adding a lot of volumetric fog. Lastly, I added a simple rain effect Niagara particle system I developed during a previous project to really tie the scene together and provide that nice contrast of the blues & greens from my mood-board!
I've included a screenshot gallery below showcasing the final environment (bear in mind the rain effects are unfortunately only visible during render due to live rendering in view-port limitations by my system):


Like I said, I'm really proud of this environment. I think the research in the prior post has gone a long way to influencing the design here, and of course I was incredibly lucky to locate such a wealth of high quality assets that fit my narrative so well! For now though, that's one part I can check off the list before moving onto sourcing my characters and their animations.
Obtaining Character Assets
Now I could move onto obtaining the characters that would populate this environment I'd created. I decided to start with the monster first, and was incredibly lucky to locate a pre-rigged asset that perfectly matched my research material!
Simply titled 'Arachnid' by Darkkormax, this asset's look was spot on, almost as if it had been plucked from my research section on the previous post! A link to this asset can be found here.
This asset actually came with several colour variations and a host of animations ready to go! 28 of them to be precise. These included standard walk, run and idle animations. But also ones like death animations, attacks etc. Even though these latter ones wouldn't be utilized for my animation, I still felt it was worth mentioning just how complete this pack was! I've included an image below showcasing the asset with the colour option I decided to use:

This covered the 'stalker monster' for my animation, but I still required a second more humanoid monster for the final shots before I could move onto sourcing my human survivor. Thankfully, I was able to locate an asset called 'Insektoid Monster 04 - Game Assets + Extra' by Stigma Studios. A link to this can be found here.
This asset perfectly encapsulated the human/insect hybrid, zombie type creature I wanted! This asset also came with different colour options, all pre-rigged with several animations built in such as: idle, walk, run, jump etc. These sadly don't serve the purpose for my narrative, but it's nice to know that they're on hand if I need to blend them in later on in production! I'll need to source the animations that fit my purpose later on, along with those for my human character, so I'll cover that in a section further on in this post. In the meantime, here's a screenshot of the asset being showcased by the developer for your reference:

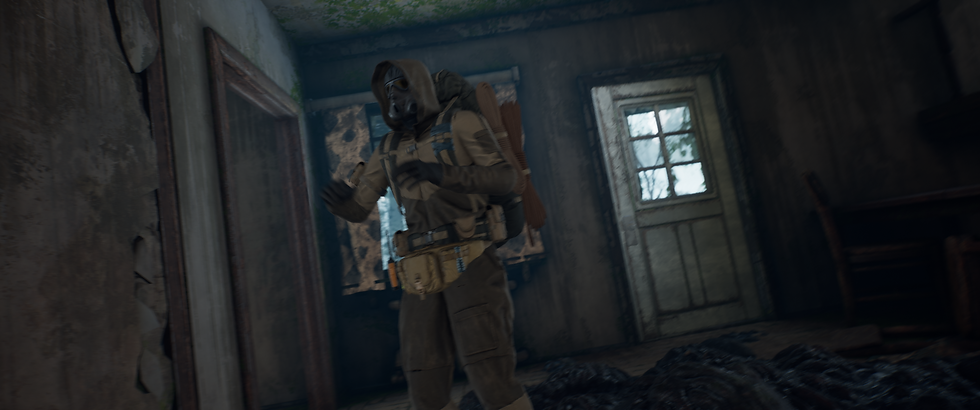
This covered the bases for my monster characters, now all that remained was my human survivor. Taking influence from my research material (gas masks, survival equipment, backpack, coat etc), I managed to locate a pre-rigged asset which was nearly perfect! The asset in question is called simply 'Post Apo Survivor' by TH Studio, and a link to this asset can be found here.
This asset pack once again came with several variations for me to choose from, but also had the unique feature of being able to disable clothing items for each. This gave me a much wider variety to choose from other than simply just colour pallet re-skins of the same model. The asset sadly didn't come with any animations as standard, but I was impressed with the fact that the asset also had the inclusion of new bones for the character's backpack. This would avoid any strange warping of the materials where the engine would mistake the backpack for simply an extension of the character's spine once animations were applied. Either way, I'll move onto the animation process shortly, but for now I've included a screenshot of the asset below for your reference:

There we have it, that's all my characters now sourced and ready to go! I brought them into my Unreal Engine project and tested the rigs, just to ensure I'd have no issues in the next stage of the process, and am pleased to confirm they work perfectly! For now though, it's time to move onto sourcing the animations for the survivor and insektoid monster characters.
Using Mixamo to Animate My Characters
For the outstanding animations, we were advised to use a free site known as mixamo (a link to this can be found here). There's a whole workflow involved in bringing these animations into Unreal, but I decided to try and find the animations first in case I had to use any additional resources. Thankfully though, Mixamo was equipped with everything I needed!
For the survivor character, I broke down what movements he would be making into the list below:
Searching through boxes.
Searching for the source of a noise.
Hiding from the monster.
Running to a stop (preferably in a tired state).
Sitting down on a chair.
Relaxing/sighing while sat down.
Being attacked.
This meant I needed to source a minimum of 7 animations, though possibly more to blend together if necessary to assist with the flow of the narrative. On Mixamo I was able to locate animations that, while not perfect, would suit the purposes of these movements. These are titled as follows:
Looking Through Files Low - An animation of a human character crouched low searching through files.
Nervously Look Around - An animation of a human character nervously looking back and forth around their surroundings.
Hiding - A simple animation of a character taking cover behind a tall object.
Running Tired - An animation of a character taking a few steps before doubling over in exhaustion.
Sitting - A simple animation of a character examining a seat behind them before sitting down.
Sitting 2 - A variation of the previous animation. This features the character placing their hands between their legs and leaning forwards.
Jostled Passenger - A seated character is shaken as if the vehicle they're on suddenly crashes or makes a sharp turn.
To supplement the above animations, I also located variations of the sitting ones in case blending was necessary. Additionally I also sourced some different options for the hiding animation, with one featuring the character vaulting over a low object before taking cover behind it. Lastly I obtained some idle crouching animations to cover my bases as the 'looking through files' animation had the character's fingers flicking through files. This of course is something which would not be present in my environment, so if I needed to blend the animation after the character crouched down into more of an idle stance I would have that option.
Next I moved onto the insektoid monster. His movements would be very simple, requiring only three actions at the most to complete his screen time. I've broken these down into a list below:
The monster stands up from behind the seat the survivor is in.
The monster idles.
The monster attacks the survivor for the closing shot.
Returning to Mixamo I found two animations that would perfectly suit my needs! I've listed these below with their titles on the site as well as a brief description of what each one entails:
Zombie Stand Up - A zombie character starts in a face down position before dragging themselves to their feet and ending with an idle stance.
Zombie Neck Bite - A zombie character lunges forward at neck height, clamps their hands down on the victim's shoulders and begins to bite.
As the first animation ends in an idle pose, in theory I should be able to extend that and then simply blend it with the biting animation to create all the insektoid's movements required in a single sequence! This is the ideal scenario, but we'll have to see if that pays off in practice.
Either way, I'd now located the animations I wanted to use, so it was time to bring them into Unreal. The workflow from Mixamo to Unreal was actually incredibly straight forward, and while there were some technical hiccups to overcome, I'll go into those in more detail after we've covered the basics. To begin this new workflow, as I would with any new process, I took to YouTube to locate some tutorials and discovered the below video from Pixel Helmet:
This is a video I had to refer back to constantly, as sadly this process was nowhere near as simple as "download FBX file from Mixamo, import it into Unreal & map it to your asset's skeleton", which naively I had hoped it would be.
The first issue was that the Unreal Engine mannequin rig, which my assets' skeletons were mapped to, is in an A pose. Meanwhile, the characters on Mixamo were in a T pose. This meant if I simply used the animations as they were, the characters arms would be entirely out of position and would require a lot of key-frame clean up to get to the state I wanted. As this isn't an animation based assignment, I'd much rather avoid that if possible!
You'll note in the video that the creator advises to use Blender to essentially adjust the arm positions of the mannequin to match the Mixamo base. As I didn't want to really learn a new software at this stage, I opted to replicate the process in Unreal. This wasn't too difficult, requiring me to simply open up the skeletal mesh for my characters, bring the arms up into a T pose, then save the new version as default. This, while not perfect, seemed to do the job!
I was then able to follow the tutorial pretty much beat for beat. Telling Unreal to use the new skeleton as a reference pose. Bringing the Mixamo character in to compare with my characters to ensure the same amount of bones were present and the naming conventions matched (though it's worth noting here that I had to do some trickery with the survivor's backpack to tell Unreal to omit those bones from the animation. Meaning the backpack would still move with the 'root' of the character, but wouldn't warp as they leaned forward or crouched down). THEN, after all the re-targeting for both characters, it finally became as simple as 'download FBX, bring into Unreal, map to characters'.
There were some issues with a couple of animations having odd frames where the character would spin wildly on their axis which obviously was unintentional. Though, using the knowledge I gained from my PTA assignment, I knew how to fix this through clean up. Simply opening the animation, baking it to a control rig, then deleting all the key-frames for the offending frames and saving the new version. My animations were good to go!
VCAM Issues
With my environment, characters and animations ready, I then turned my attention to VCAM. As I don't personally own an Apple device (which was, until recently, the only way to officially utilize Epic's VCAM facility), I originally planned to use the Android plugin available on the marketplace to hopefully emulate it.
This sadly did not work. No matter what I tried, what tutorials I followed, what extensions I allowed through my firewall, what android device I used, what version of the engine I was on etc. It would simply not let my phone and PC communicate.
I then borrowed an older generation iPad from my parents in the hopes that I could use Epic's official app to get this to work. Sadly it was the same story. No connection, no ability to use VCAM.
This unfortunately is around the time my health issues in the last year got far more serious, so this assignment had to be placed on the back-burner while I took care of myself. Now that I'm back to (mostly) full health, and wanted to proceed immediately with this assignment, I went back to the drawing board with VCAM.
Since my break, Epic have actually updated the app to allow android device access, and my girlfriend has actually purchased a 10th generation iPad. This gave me two new options available for VCAM utilization, and I can report that... Neither worked.
I believe the issue may be with my PC itself, or my network security. As, while I could actually get the devices to communicate and could view my Unreal scene on both my phone and the tablet, I was completely unable to record camera movements in the sequencer. No matter what I tried, the take recorder in Unreal would just not track the movement once the record button was hit, or the engine would crash completely as soon as I tried. Needless to say, this caused no end of frustration, and I decided to proceed with the construction of a pre-visualization simply using cinecam actors in the meantime before my tutor could assist me with a solution.
Creating a Pre-Viz
As I stated above, I'd made the decision to press forward at this stage without the use of VCAM until a time where my tutor could assist me with it's implementation. After discussions with them, we established that I take I'd made of the final cinematic using cinecam actors could be used in place of a pre-viz. This is because I'd already produced the environment, characters & animations and placed cameras, so it didn't make much sense to go back and produce a 3D blockout to test camera positions if I'd already done so with the final assets.
The production of the pre-viz was fairly straight forward as I'm very familiar with the use of the cinecam actors and the sequencer within Unreal. I knew how I wanted my shots to look, so set to work experimenting with camera placement and animation blending to get the best results possible! I've included this first cut of the pre-viz below:
I think in hindsight I'm really glad that I'm still getting the option to utilize VCAM. I made a rash decision to use cinecams out of frustration and concern over time, but given that all the shots were envisioned to use VCAM, it feels so artificial without it. That's not to say it's without it's merits, I still think the narrative is really strong! The animations themselves also work well and the characters suit the environment! I also think the depth of field changes during the shots and the camera movements (though simple compared to how they would be in VCAM) achieve a basic version of what I wanted.
I think I'll change the position of the camera during the opening shot though, as the character is quite hard to spot among all the other greens of the environment. This of course in the narrative would be the survivors' purpose for wearing green, but as a cinematic piece, it doesn't work. Additionally, I think the rain effects may be a bit too overbearing. It's not worked as well as I'd hoped, so I think I will remove this for the final animation.
The animation of course still needs all the post production touches, including audio and shot pacing, but I think this a great starting point to proceed with in the next post!


Comments