Creating My Effects & Software Comparisons
- Mikey Owen
- Feb 20, 2023
- 31 min read

Now that my final environment is constructed, it's time to begin the creation of my final visual effects in my chosen software options.
This post will be organised into sections dictated by my 4 effects: water, fire, sparks & mist. From there each will be broken into 3 subsections for my software options: Unreal Engine's Niagara particle system, Embergen & Adobe After Effects. From there I intend to close out each effect section with a comparison between all the different software options I've used, and a conclusion around which provides the optimum workflow.
Without further ado, I'll begin this post with my water effects.
Water Effects
The first effect I'm attempting to add to my scene is the trickle of a small waterfall running from the hole in the ceiling, down the back of the statue, and finally collecting on the floor by the altar. This effect to me on paper seemed like it would be the most straight forward to construct, but unfortunately I've had some issues which has sadly prevented me from using it all together.
I've scoured the internet for tutorials on the creation of small waterfalls using Niagara's particle system, and was able to locate a plethora of options. I further refined these by looking for ones which specifically included instructions on how to apply collision data, so that I could seamlessly have the water flow down the geometry of the statue. I was able to locate some good guides, but this is where the issues arose.
It feels best to first off include a link to the tutorial I used for your reference, which can be located here (and delivered by the quietest man on the internet). It details how to use a simple particle system to act as a foam like spray cascading down a plane and colliding with any meshes it comes across. It seemed perfect, but when applying it to my scene I discovered that the collision data for the statue was actually completely off. The bounds for the collision of the statue were much further away from the edges of the geometry than I'd initially anticipated, and to fix this issue I would essentially have to recreate the mesh from scratch in external software. I've included an example screenshot below for your reference so you can appreciate the issues:

As you can see from the above image, the water is impacting an invisible surface several units away from the actual statue mesh. This appears even worse from adjacent to the impact, which is unfortunately where my camera capturing this effect is located.
I've been advised by my tutors that I have a tendency to 'over-do' it on some assignments, which isn't inherently an issue, but it does cause significant stress as assignment deadlines loom ever closer. To that end, I've decided that it would make much more sense to scrap this effect rather than waste valuable time attempting to fix this issue. The collision data is something I was fully reliant on for producing this visual effect, and with it being so out of place, it just isn't worth the time sink required to mend it.
It's worth noting that I did also experiment with the Niagara Fluids plug-in that is currently in BETA testing for Unreal Engine 5, as this comes as highly recommended for production of these kinds of effects. But unfortunately this only contained templates which were far too small for my scene and would not scale uniformly to fit. This is why it was far easier to create the effect in a standard Niagara particle system.
However, I don't want this time to have all been a waste. So, given that I did create the visual effect in Niagara (as you can see from the reference image), it's still worth me delving into the workflow I used to establish the pros and cons of using the system this way.
Niagara Workflow
The first step of using the Niagara particle system to generate this water effect was to add it to my content browser. I selected to create a new system based upon an existing template built into the facility - Fountain. The fountain preset was a simple stream of particles flowing upwards from a central point (picture a sparkler firework or a sprinkler).
From here I opened the simulation and set to work customizing it to produce my waterfall. The first thing I altered was the Shape Location value. This determines the aspects of the actual emitter for the particles, which was a sphere by default. I adjusted this to plane and set the size according to the hole in the ceiling and the distance from this hole to the floor of the altar. From there I amended the 'Drag' of the particles to a value of 2 which pulls them downwards from the emitter. I then added a 'Collision' module to the particle update system, which enabled it to read the collision data from any meshes in the path of the particles and react with them accordingly.
After this I changed the velocity parameters minimum and maximum values (to 100 and 200 respectively), in order to adjust the particles flow into something similar to that of a waterfall (up over a slight lip, then all downwards from there). Next I went to the initialize particle tab and adjusted the sprite sizes to make them much smaller so they could imitate raindrops rather than a torrent of moving water. I then also adjusted their lifetime minimum and maximum values so that the water particles would flow all the way from the ceiling to the floor without 'dying' en route. It's worth noting that this change caused a huge dip in the performance of my scene, so clearly these particle systems are very demanding on your system.
Now I increased the spawn rate parameter of the particles so that they were more dense. This would serve to better emulate a stream of water rather than individual droplets, though once again caused a significant drop in performance. Lastly, I modified the friction and restitution values under the collision modifier so that they would 'bounce' and 'flow' along the surfaces of any input collision data (in the case the statue).
All that remained now was tinkering with things like the particle colour (I opted for a 90% transparent cyan/grey shade), and previously amended values to tune the effect into what I was looking for. I've included a screenshot below of the particle system's user interface for your reference so you can locate the headings I'm referring to in this section:

From here I placed it into the scene, noticed the previously mentioned issues and, following extensive research into collision data within Unreal, came to the decision I discussed at the beginning of this section.
I'd now to breakdown the pros and cons of the Niagara particle system for creating effects like these, though obviously there will be no comparables at this stage. Instead, please consider this as a template for the comparisons & conclusions I'll be drawing at the end of this post:
Pros
Built into Unreal Engine system. No additional downloads or cost necessary.
Plethora of tutorials available online due to systems wide user-base.
No transfer between software required. Simply drag and drop system into environment.
Real time feedback provided when changing parameters.
Works 'out of the box' with Unreal asset's lighting and collision data.
Can alter rendering mode (CPU or GPU intensive/fixed or dynamic bounds) to smart save on system resources.
Large selection of existing templates both built into engine and available on the Unreal Marketplace for you to customize.
Having actual emitter available within scene to edit allows for greater experimentation and control during cinematic creation.
Cons
Not particularly friendly to new users. User interface can be overwhelming on first glance, and name of certain fields doesn't accurately reflect what they adjust.
Options are quite limited compared to other software options. Seems quite reliant on existing templates to achieve effects rather than the user being able to build their ideal system from start to finish.
Collision and lighting sync between engine and particle system is useful, but if the data is incorrect for the effect you're producing (like my situation) you're unable to fix it for just the particle system without altering the entirety of the asset.
Takes large toll on system performance for complicated effects.
Can't uniformly adjust scale of particle systems. Either get it right first time or spend ages manually altering parameters until it fits.
Conclusion
It seems unfair to draw a conclusion on the optimum workflow and software option for this effect given that I only used one and it didn't work anyway! I'd therefore view this more as a template for the layout of the remainder of this post. However, the conclusion I can draw from this is that Niagara is a great choice for the creation of water effects.
It features a wide variety of options, is fairly straightforward, built into the engine that houses your environment and has so many users worldwide that you're guaranteed to find a tutorial online to assist with anything you might need. It's not without it's faults though, and can lead to a lot of headaches if all the working parts (emitters, surrounding geometry and assets, lighting etc) don't line up with the visual you're hoping to achieve.
Really though, it boils down to this: I'd still wholeheartedly recommend Niagara for this effect, as my previous research lead to a rather surprising discovery that, if you want to use the effect in an Unreal Engine environment, this is literally the only option present (for now) that can do so without the need for post production compositing (or constant moving of assets from one system to another).
Fire & Smoke Effects
Now this section will be a little different from the previous, because (aside from the fact that the effects actually work) I need to produce two different types of fire & smoke effects: a small, dim flame with no smoke for the candles littering the scene and a large, smokey fire for the various braziers hanging from the ceiling.
Rather than break up this multi-part section of the post into even more sections, I felt it best to simply discuss both at the same time as I'll be using the same software options and much the same approach for all of them.
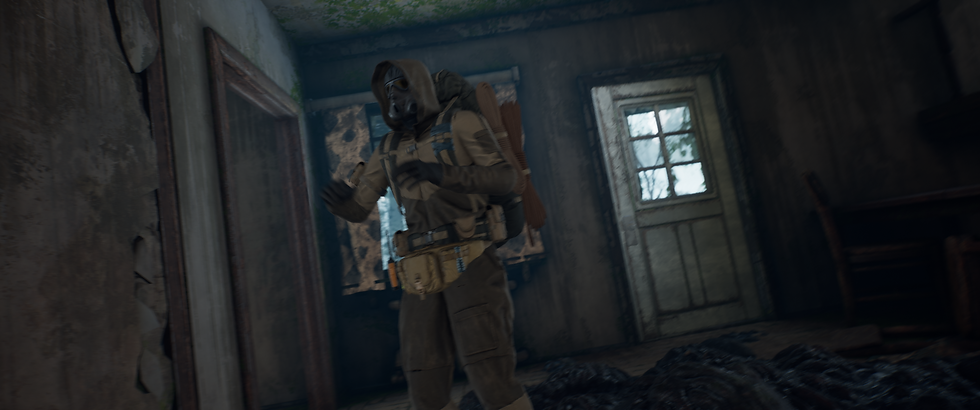
I decided that the best way to display the result of these effects would be to also use brief video clips rather than still screenshots, as the movement of the flames and smoke plumes will be imperative to the effectiveness of the visuals (and obviously won't be seen on images). Therefore I placed two additional static cameras within my scene that have captured 10 seconds of footage of a group of candles and a brazier respectively. I can then add my effects from each software option to these shots and create a fair comparison of each (additionally the static nature of the cameras will avoid the need for any tracking to be completed in After Effects! Though more on this later). I've included the effect-less footage below for your reference:
Candle Shot (still camera, no effects)
Brazier Shot (still camera, no effects)
Hopefully with the above you get the idea on how I wish to layout these effects tests. So, with the cameras ready, I can move onto the creation of the fire effects in my first software option: Unreal Engine's Niagara particle system.
Niagara Workflow
I'd like to begin this section by discussing the candle fire effects before moving onto the censer, and this is something I'll continue for the other two software options.
Regarding the candle effects however, it's made me realize that the name for this section is rather misleading, as I didn't use the Niagara system at all! Instead I'd rather the 'Niagara workflow' was simply streamlined into 'Unreal Engine' workflow, as they were still completely produced in engine. I'll explain why I've opted for a different approach than using Niagara's particle system below:
Particle systems can be very GPU intensive, and remember I have quite a few candles within my scene! There was absolutely no point in rendering such a large number of particles to create a flame when none of the candles would be seen up close (or at least not close enough to really appreciate the detail of a particle system). I therefore opted to simply create a material of a flame.
The first step was to obtain an image of a candle flame from the internet, then import it into Photoshop and make it a monochromatic image. I've included the aforementioned image below:

I then added this image to Unreal Engine, and ensured I turned off SRGB in the texture settings. From there I added the image to a new Unreal Engine material. converted that materials blend mode to transparent, and plugged the image into the opacity node. From here I followed a tutorial on how to have the emit a flame colour and distort as if caught in a slight breeze. A link to the tutorial can be found here, but I'll attempt to explain the steps taken down below as the creator doesn't provide any instructions in the video:
Use a simple white texture sample and a multiply node for the base colour and emissive fields. This allows the material to be self-lit.
Use a built in Unreal Engine water normal map, combined with a panner and texture coordinator notes (which values that you adjust to your desired result) to create the 'breeze' blowing the flame.
The above works best when also combined with a SmoothStep node through a Lerp to allow you more control and randomize the movements more realistically.
Once the last two steps are completed, plug this all into the UVs field of the flame texture sample to complete the material.
There are of course some more intricacies to the process than I've explained above, but that was the general gist of the workflow that I was able to take from the tutorial. I've included a screenshot of the final material node setup below for your reference:

With the material complete, I then mapped this to small planes and positioned them where the flames would be located. The emissions from the material were quite a lot lower than I originally anticipated, and increasing them resulted in washing out the colours of the material. Thankfully the candle assets which I was using also included an option to enable a 'lit' material on them which added bright surface light scattering to the candle itself. With this included the overall effect is much better!
I've included a render of the final Unreal Engine candle flame below:
Candle Flame (Unreal Engine Material)
Now for the censers. This was a much more in-depth workflow, and I actually used the Niagara particle system this time, though the first step was very similar to the candle workflow. I first needed to create a flame material, but on a much large scale. I therefore repeated the steps described in the previous section until I had a similar effect, but for a large burst of flame that would fit the censer.
From here I opened the Niagara particle system and began with a fountain system as a template. I added my flame material into the 'dynamic material parameters' field on the Niagara system, then adjusted the tiling values and distorted it slightly to avoid the edges of the effect being too sharp. Next I went to the shape location field (which essentially is adjusting the shape of the emitter for the particles) and changed this into a sphere to fit the contours of the asset geometry.
Next it was simply a case of adjusting the various fields under the initialize particles menu until I had the effect I wanted. I know that sounds like a brief way of saying a lot, but there really is no other way of putting it. I changed the randomization so they stuck to the general shape of the emitter, upped the minimum and maximum sizes so the embers grew and shrank at random intervals, and changed the colour to match a nice bright flame.
I did then however add a scale colour field to the particle system, and adjusted the curve so that they had a nice gradient, becoming darker and more transparent at the tip of the embers. I was fairly happy with it at this stage, but wanted to complete some more research into how other artists create this effect with the same system to see if I could enhance mine further. I then found several tutorials detailing how to add things like ember emissions, smoke, heat haze etc. These were done all within their own particle systems which were then compiled into one big Niagara system which I could drag and drop into my scene.
The workflow for these additional effects was identical to the main flames, though obviously the size of the particles and colour scheme was different (the smoke being grey, and the heat haze being transparent for example). I've included a screenshot of the final Niagara particle setup below (though I appreciate it's hard to ascertain what's taking place without the inclusion of all the additional settings. This is mainly for reference purposes):

I then lastly added some emissive value to the system to light the scene and voila! One effective flame VFX to place within my censer. I'm quite lucky that these censer assets I've obtained have well constructed geometry with holes in them to allow for light to pass through. I'll admit I was concerned that they may have been plane mapped textures but I think the final result looks great! I've included a video of the final Niagara system in action below:
Censer Flames (Niagara Particle System)
With my fire effects now constructed within Unreal Engine, it was time to try and use my next software option to replicate this and see how the workflow (and final result) compares.
Embergen Workflow
Oh boy. This section of the assignment has been quite a roller-coaster. The Embergen workflow has been in many ways far more simple than Niagara, but when it came to actually getting the effects into my final scene, this is where things completely fell apart. Either way, let's begin with the discussion of creating the candle effects.
To start with I opened the Embergen software and familiarized myself with it's user interface. It's incredibly intuitive, and streamlined in such a way that there's no wealth of unnecessary fields that would confuse a new user (like myself). This software is designed for the creation of fire & smoke visual effects, and that is immediately clear from what you're presented with.
I think it speaks highly of this software by starting off saying that I didn't actually use any tutorials to create the effects here (until I attempted to import them into Unreal Engine anyway). It was very simple to establish what exactly every function did, and I think this in a large part down to the real time feedback Embergen provides. If you change something like 'pressure' (this equates to the size of the fireball), you'll instantly see the fire growing larger and more intense in the viewport. Either way, I'll discuss this further in the comparisons section at the end of this effect creation portion.
To create the candle effect itself, I began with the default flame you're presented with when opening Embergen (a small torus shape on fire). From there I actually lowered all the parameters provided to create a small smoldering flame, and changed the torus shape into a sphere. I then dropped the colour to more of a deep orange to imitate a colder flame, and removed the smoke entirely. Lastly I changed some wind parameters so that there was a nice breeze moving the flame, and that's it! It really was incredibly simple to produce. I've included a screenshot of the final effect below running in Embergen's viewport:

Now we come onto exporting the flame into Unreal Engine, which is where things unfortunately fell apart. I first attempted a flipbook export as this is how people primarily transfer effects from Embergen into game engines. This results in a 2D animation that plays through in a sequencer. It certainly works for a candle flame, but given that I wanted a full volumetric fire for the censers I decided to explore other options.
In order to actually bring the volume data into Unreal Engine, I needed to export the flame as a VBD file, and actually install a third party plugin to enable VDB compatibility within the engine (a link to the plugin is available here). I was only able to find one tutorial that ran through the workflow for this plugin, and it was unfortunately out of date by several updates, so a lot of this I had to figure out on my own.
Essentially, I brought the VDB into the engine, importing the density (smoke), flames, temperature and fuel for the fire as different volumetric caches. From here I had to add a VDB actor to my scene, and set the various parameters to match the caches. However, here's where I ran into the first issue. The VDB actor only has options for density and temperature. I had no smoke for this flame, so had to opt for the flame option for this field. Colour data wasn't brought over in the VDB file, so I ended up with a grey, flat effect. I had to manually adjust the colour using only a single parameter, which washed out the flame completely. From here I had to adjust the samples per pixel to avoid it looking grainy, which completely overloaded my system.
I then I had to add my VDB actors to a sequencer in order to get them to play through, which is where I noticed that there was absolutely no emission value from the VDB files. To combat this, I had to add directional lights to each of the flames in order to have them cast light over the environment. After all this back and forth, I was really disappointed with how bad the final result looked. While running in Embergen, the fire looked wonderful. Far better than that which I'd created with Unreal Engine, but there was just no feasible way to transfer it at that quality into the engine. Perhaps in the future when Epic Games offers full first party VDB support things will be different, but either way, I did my best! I've included the final result for the candle flame below:
Candle Flame (Embergen VDB)
For the censers meanwhile, the approach to their creation in Embergen was very similar, though obviously this time I was aiming for a much larger flame with smoke emission as well.
I started by going back to the default scene, as I felt the torus shape would better fit the censer. I then grew the flame by adjusting the fuel and pressure parameters, and added some more randomization via the wind parameters to it was more of a raging fireball. I then lowered the amount of smoke emission as I just wanted a small amount rising from the flames (think a similar amount to what you'd expect from a campfire), and lowered it's density so it wasn't so thick.
I also attempted to import the FBX mesh of the censer that I'd exported from Unreal. This is because Embergen allows you to bring in meshes to either act as emitters or collision objects, and it was my hope that I could use the censer to act as the latter. This way the flames would realistically come out through the gaps in the geometry and the smoke would realistically condense within the confines of the censer, then dissipate as it rose above it. Unfortunately this didn't work as the geometry imported as a standard pill shape. I believe this is because the asset was part of a pack that only worked within Unreal, so would not allow transferring between different software options. This was further evidenced when I discovered this pill shape was brought about during the export from Unreal, rather than during the import to Embergen when checking the actual file.
The only other thing I then needed to do was adjust the boundaries of the volumetric effect, as unfortunately the smoke was beginning to impact the hard edges of the volume. This was another easy step though, as all I had to do was adjust the feathering width of all sizes of the boundary box. This then naturally faded the smoke out before it reached the hard edges.
I really can't stress enough how easy it was to create these effects within Embergen! I've included a screenshot below of the censer flame in Embergen for your reference:

Getting this effect into Unreal Engine though was somehow more taxing than it had been for the candle flame due to the introduction of smoke.
You see, now I had a density parameter for the VDB file, however because the VDB actor only had fields for density and temperature it now wouldn't show the flames. I tried tinkering around with this, but unfortunately was unable to figure out how to actively have both be visible. It's here where I decided to duplicate the VDB actor, and have one for smoke and one for flames. This was a bad call, as this overloaded my system and actually caused the engine to crash. It took hours of adjusting settings and re-importing files to actually get my scene to open again because it would simply crash on loading every single time.
Once I did finally gain access to my environment again however, the duplication seemed to work. All I needed to do now was change the colours of each actor to replicate fire and smoke respectively, and position them within the censer with a directional light (because once again there was no emissions data).
This was a major headache I won't lie, and actually made me re-evaluate my assignment deliverable as a whole (though more on that in the next section on spark effects). For now, I've included the render below of the final censer effects produced within Embergen:
Censer Flame (Embergen VDB)
That brings me to the end of the Embergen flame effects creation. I can now move onto my final software option; Adobe After Effects, before moving onto the creation of my other VFX.
After Effects Workflow
Now we come to my final software option; Adobe After Effects. Given that this is a post-production editing software, I opted to use the renders I'd created at the beginning of this post that were missing any effects for this stage.
Beginning with the candle effects, this was incredibly simple to create. I actually followed the later half of a basic candle flame tutorial (which you can find here) to create the effect. The only differences to this gentlemen's workflow and my own is that, rather than use drawing tools to create a stylized flame sprite, I actually sourced a png image online for a candle flame.
From there I added it to my scene on a new layer, then added a wave distortion effect. Altering the parameters of this distortion effect allowed the flame to ripple randomly throughout the video as if it was caught in a breeze. After this all it took to complete the effect was to add a simple glow modifier with an orange tint. I then messed with the parameters of my applied effects a little more until I was happy with it's look. I've included a look at the After Effects UI with the effects applied below:
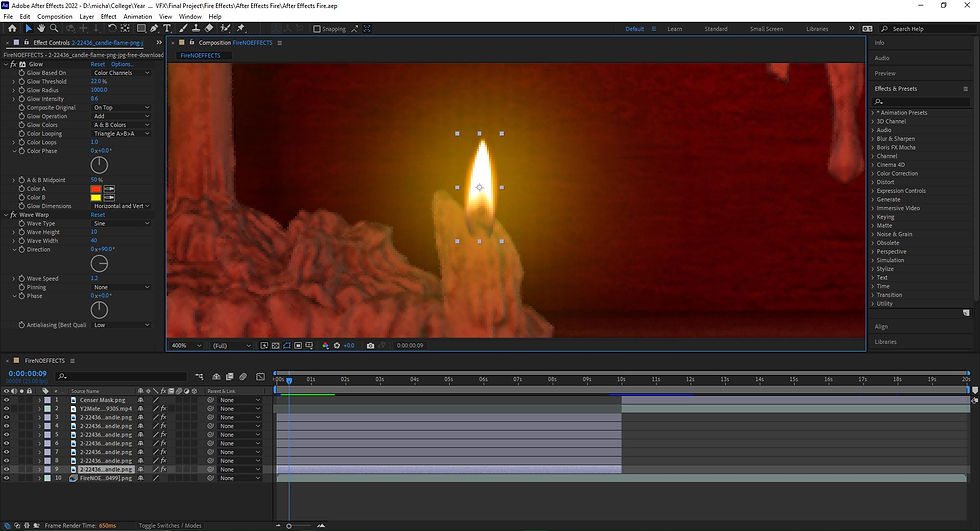
To complete the effect, I simply created multiple copies of the flame with it's modifiers and positioned them within the software to sit atop the various candles. All I had to do then was alter the parameters of the modifiers for each of them so that they were different from one another and it was finished!
This was a very simple and easy to replicate workflow, and whilst the results aren't as convincing as say Embergen, I think it's worked quite well! I've included a render of the final candle effect below:
Candle Flame (After Effects)
Now that the candle flames were done and I had a rough idea of the process to follow, I began working on the censer flames. There was one huge difference here to the candle flames though, they were housed within the censer instead of being in the open environment. This caused an issue because I could no longer simply place a flame image directly onto my footage, and would have to think of other ways to implement it.
Thankfully, my previous experience with video editing led me to believe that I had a solution. I decided to take a still frame from my footage (given that the censer never actually moves during my sequence) and import it into Photoshop. From there I carefully cut out the front of the censer that was facing towards the camera. It was my hopes that with this face on a transparent background, I could add the flames, then insert this over the top like a mask! I did decide to complete one more alteration as well to add some additional realism, adding an inner glow to the mask. This way I could have a nice orange glow around the edges of the mask to imitate the light from the fire seeping out through the gaps.
Now that I had the mask, I just needed to source the fire. I actually managed to locate a 20 second clip of some flames on a green-screen background. These flames looked perfect, so I downloaded the clip and added it to my After Effects timeline. From there I used the keylight effect function to remove the green-screen and was really happy with how the whole flame was still intact!
When I brought the mask I'd made back into After Effects it did work as expected, but I still wouldn't say it's up to the professional standard I'd hope for. Additionally, as I'd expected, this attempt to 'fake' 3D volumetrics just never looked as good as if I'd actually placed the fire in my environment instead. However, as the purpose of this assignment is to make comparables between these software options, I persevered.
In an attempt to add a little more realism, I actually lowered the opacity of my mask just a touch. This way some of the flames behind it actually clipped through, but it wasn't overbearing. It was my hope that this would look like flames 'breaking out' through the gaps in the censer (similar to what I'd hoped to achieve with the collision data in Embergen), and it 'sort of' worked. Lastly to complete the effect, I added the orange glow I'd applied to the candle flames to this flame as well, and even key animated the intensity of the glow so it appeared to 'flicker', I hoped this secondary movement within the scene would help sell the effect a bit more. I've included a screenshot below of the After Effects UI for the creation of my censer flames:

That was that! I'd done the best that I could with the tools available to me, though can't help but feel that I'd barely scratched the surface of After Effects capability for these kinds of effects. The software features some incredibly advanced camera tracking facilities, and even the ability to work within 3D space, but my research lead me to believe this was the optimum way to create these effects in my allotted time-frame for this assignment. Perhaps in future endeavors I'll be able to explore the capabilities of effect generation within After Effects more! Either way, I've included a render below of the final censer flame created within After Effects:
Censer Flame (After Effects)
With that, my flame effects were completed. I've decided to wait until the end of this post to weight up the pros and cons for each software option. This way I can more accurately delve into which workflow is optimal both for each effect type and in general for myself as a user. For now, I'll move onto the creation of my other effects below.
Electrical Spark Effects
Unfortunately, we now come to the second disappointment in this post alone. I began working on the spark effects, and came to exactly the same conclusions as I had for the fire effects. This is because they essentially operate in the same way: small light sources that act as fire particle emissions.
Because of this, I felt that spark effects were not worth pursuing at this stage. The results would have been exactly the same as the fire effects based on my initial findings, and given that I wanted to have them go off randomly, having to incorporate directional lights in Unreal Engine that matched them would have been massively increasing my workload. To that end, I've decided not to include them as part of my workflow comparisons, which is after all the whole aim of this assignment.
I did however discover that I had access to an electrical sparks package I'd purchased on the Unreal Marketplace for a project last year that will fit the bill. I've included a link to it here.
So to summarize, I will not be including spark effects as part of my software comparisons, as their work flow will produce identical results to those of the fire effects. But I will still however be including pre-made ones in my final environment to enhance my final cinematic. With this out of the way, I can now move onto the creation of my final effect; the ground level mist.
Mist Effects
I can now move onto my final effect set before the creation of my final animation proper; the mist effects. I wanted to have some ground level mist swirling around the floor of my scene to add some additional ambiance, and really heighten the dark, Gothic feeling I wanted to convey.
For this effect, I've approached it in exactly the same way as I did with the fire & smoke. Starting with setting up a motionless camera within my scene, so that I could always capture the same area with the same lighting for a fair comparison of each effect. Additionally, I can use the 'effect-less' version of the footage for my After Effects workflow. I've included the footage sans effects below for your reference:
Mist Shot (No Effects)
Now that I've established my shot, I can move onto the creation of my first mist effect. This will be generated in a similar way to my candle flame effect, with an Unreal Engine material applied to a volume. I've detailed this in the section below.
Unreal Engine Workflow
When approaching the creation of a fog effect within Unreal Engine, you may recall I said earlier in this assignment process that I had a fairly clear idea of how I was going to do so (I originally even stated I wouldn't be doing software comparisons for this effect because of my confidence in my idea). However, I decided to conduct some research into how to create the optimal fog effect within the engine and I'm so glad I did!
I found that there are actually several different ways to do so, with each option being best suited to a different use case of the effect. There was one tutorial in particular that I discovered which stuck out to me (a link to it can be found here) where the creator demonstrates 4 different fog production methods, and even displays comparison renders to help the viewer establish which option is right for their scene!
I opted to use their second method; creating a dynamic fog material with editable parameters which is applied to an adjustable volume (like a standard cube for example). The material workflow ended up being quite complex, so I was glad to have a tutorial on hand which explained the process in easy to follow steps! I've included a screenshot of the material's nodes below for your reference:

As you can see, it's quite a complex material with a lot of nodes and parameters affecting the final result. I'll attempt break it down into individual steps for it's creation below:
Create a new material and set it as a volume, then change it's blend mode to additive.
Create a standard 'white' sample and plug it into the albedo node.
Create a system of panners (to move the fog) and mask sizes (to change the size of the effect dynamically) and plug them into a 'noise' texture sample.
This noise texture is then plugged into a 3 point level node as a texture, with a 'map control' node put in place to simply act as an attribute you can adjust to increase the density of the mist.
Create a series of mathematical nodes to dynamically adjust the movement of the mist and have it 'roll' across the environment.
Combine all of the above and apply it to the extinction node to ensure the mist 'fades out' at the edges as it sweeps along the floor.
The creation process obviously had a lot more steps to it than the above, but I've tried my best to simplify it so you can understand the purpose of each node.
Either way, with the mist material created, I generated a material instance from it (think of it as an editable copy of the material which you can alter without changing the base values of the original), applied that to a standard cube and placed it in view of my camera. From here I opened the instance and adjusted the parameters until I was happy with the look. You can see a video render of the final result below:
Mist Effect (Unreal Engine Material)
I think the final look is quite effective! In motion you can see the mist nicely swirls along the floor, and the ability to adjust the thickness and movement of the volume on fly allows for plenty of different combinations! In retrospect it may better serve the scene to have the mist be a little less dense and closer to the floor. If this ends up being the final choice for the effect I'll look into adjustments.
Embergen Workflow
Oh Embergen. Once again I was so confident with the result of the effect within the software, but the transfer process to Unreal Engine was a complete nightmare. I'll begin with discussing the in-software workflow first though.
To create the mist effect, I actually began with an Embergen preset (only just now discovering that these were an option) called dust storm.
This opened a new project file of some dusty smoke rolling across an environment, perfect as a foundation for some swirling fog! The first thing I did was adjust the shading parameters so the fog went from a dusty orange-brown to more of a light grey. From there I reduced the wind values so the fog only moved a little along one axis. Then I set to work altering things like density & force to allow the mist to be a little more translucent with it's movements slowed right down.
The big discovery though came through my experimentation with the shredding field. This essentially sends random gusts of wind from all angles through the smoke, creating ripples and wisps around the volume. Changing some parameters here gave the mist some height, and created these wonderful swirls along the top layer. It was my hope that I could position the fog so that these would wrap around parts of my environment like the benches and pillars! I've included a screenshot of the mist effect inside of Embergen below:

Now that I was happy with how the effect looked, it was time to import it into Unreal Engine to add it to my environment. This is unfortunately where issues started to arise again.
The import method I used was identical to the previous Embergen effect for my fire. Using the OpenVDB plugin to bring an exported VDB file (though obviously this time I just exported the density value rather than flames as the simulation was only smoke based), but when I brought the VDB in, it had 0 dimension values. This meant that there was actually no effect there! It took me a long time to realize this, as I was concerned that maybe the effect was too performance heavy to display, or that perhaps the pivot wasn't aligned so the mist was actually somewhere beyond the confines of my environment etc.
Once I had established the issue though, I was completely unable to fix it. I attempted to import the VDB again with different parameters each time; altering the compression value, exporting it with all options enabled like flames and temperature etc. But to no avail. I then had to recreate the effect from scratch once again, as clearly there was some issue with my Embergen file that no amount of experimentation was able to fix.
Once I had recreated it though, the second export worked. The effect once again though looked nowhere near as good as it did with the Embergen software, even when I attempted to render it with Path Tracing as opposed to Unreal's real-time Ray Tracing render (some guides online stated this would improve results). I even upped the sample per pixel count and removed any compression to try and improve it, but it still looked choppy. For some reason as well, the effect 'jittered' a lot, meaning I had to drop the opacity as low as I could to avoid it being noticeable in the final renders. Either way, I've included a video render of the Embergen effect within my Unreal environment below:
Mist Effect (Embergen)
As you can see, the final effect isn't the worst thing in the world, but the lack of being able to alter the colour of the effect and the jitteriness I mentioned mean it's a far cry from how it looked within Embergen. I'm once again disappointed by Unreal's lack of VDB file importation, and really hope it gets some first party support in the near future.
After Effects Workflow
For the After Effects workflow, the process was surprisingly simple and yielded some really good results! for this workflow I actually found a written tutorial this time, the benefits of which were being able to work through at my own pace and gain a better understanding of the process involved. Additionally it was during this step that I came to the realization that VFX creation in After Effects gives out what you put in. There's a surprising depth to it, always ways you can improve upon what you've created and add more and more detail. A link to the guide I used can be found here.
To create the effect, I first began by importing my effect-less image sequence I included at the beginning of this section. From there I created a simple white solid layer and drew a circular mask over the center. Next I feathered the edges of the mask to add some opacity and 'wash out' the overall white colour of the solid.
Next, I added a turbulent displacement effect to the layer. This essentially mapped some noise over the layer, and I then key-frame animated the offset and evolution values. This animation allowed the noise addition to 'move' across the layer, which appeared to make the fog ripple and move realistically. I then duplicated the turbulent displacement effect and changed the values of the offset & evolution to add some more depth to the effect.
Lastly, I converted the layer into a 3D one which allowed me to manipulate it's location in a 3D space. I then manually rotated it round and re-positioned it to align with the floor in my sequence, and voila! One mist effect created in After Effects. I've included a screenshot of the After Effects UI below with the transformation tool of the mist layer visible:

With the effects generated, I exported the After Effects composition into Adobe Premiere Pro and rendered it into a final video file. I've included this video file below so you can see the full effect in motion:
Mist Effect (After Effects)
As you can see, I think this effect turned out rather well! I'm surprised that the creation of a 3D volumetric effect in a 2D compositing software turned out how it did, but it's made me consider some options.
Additionally, as I stated earlier in this section, this effect could still have been improved with more time devoted to it. The tutorial I used went on to discuss the use of adjustment layers and duplication of the fog effects to add some more dynamic values to my scene. The only issue I take with the effect I've produced is that, for a few frames, you can clearly see the hard edge of the mist layer. It would have been nice to have removed this for testing, but should I come to use this effect in my final animation, I will look for ways to improve it.
Pros, Cons & Conclusions
Now that I've created all of my final effects, formed some solid research into the capabilities of each software and explored their individual workflows in depth; I feel I'm in a good position to deliver my final comparison pros & cons lists, along with a conclusion on which software options has the optimum workflow (for me) for each effect.
I've decided to break this section down by each software option. I can then weight up the positives and negatives of each, before ultimately reaching a decision on which workflow I will use for my final animation's effects.
Unreal Engine
Pros
Environment is already located within Unreal Engine, no file transference necessary.
Plenty of tutorials available online due to the systems wide spread usage.
Engine is free, so no additional costs required.
Multiple options to produce visual effects; Niagara, Unreal Materials, Cascade etc.
Real time feedback provided when changing parameters. Given the effects are already housed within the engine there's no need to re-import when adjusting.
Instant feedback available on system usage. No speculation on whether effects will be too intensive, engine tells you there and then.
Large selection of existing templates both built into engine and available on the Unreal Marketplace for you to customize.
Having actual emitter available within scene to edit allows for greater experimentation and control during cinematic creation.
Speaking of Niagara & Unreal Materials, customization is seemingly endless. Wide variety of options available to tailor effects to your needs.
Ability to use collision data from environment meshes to enhance how effects react to your scene.
Cons
Without the use of tutorials, the options available can be quite daunting to inexperienced users. A lot of the labels are ambiguous at best and it's tough to ascertain what each does.
(Speaking of Niagara) the wealth of templates available can potentially limit creativity. It's much harder to build your own system from scratch instead of using one as a foundation.
Collision and lighting sync between engine and particle system is useful, but if the data is incorrect for the effect you're producing (like my issue with the water effects) you're unable to fix it for just the particle system without altering the entirety of the asset.
Complicated effects take a very large tole on system performance. Optimization could use work.
Importing volumes from other software allows use of uniform scaling to help them fit your scene. Unable to do so with Niagara particles without changing a large amount of particle system values.
Embergen
Pros
Easily the 'best looking' of the options. The effects produced are of the highest quality.
Very user-friendly interface. All options are clearly labeled and no confusion around what they impact.
Real time view-port render allows for instant feedback when changing effect parameters to fine tune details before export.
Developed especially for fire & smoke simulations so absolutely nails them!
Very supportive developers who are on hand to answer questions if required.
VDB & flipbook export allows for interaction between most 'mainstream' modelling programs.
Free trial available for experimentation, allows 14 days of export capability and infinite use of other facilities.
Compositing of effects with image sequences in other software options result in realistic effects renders (researched into this, but unable to apply for my own workflow).
Cons
Expensive if purchasing for full time licence - $300 for 1 year of support on an indie licence, educational licence is $60 and application required.
Software is still new, so bugs and issues may arise.
Exportation of VDBs not compatible with Unreal Engine without use of 3rd party plugins, which massively diminish quality of render.
Only usable for fire & smoke effects, so quite limited in that regard.
Due to the quality of the renders, larger effects have the biggest impact on system out of the software options.
After Effects
Pros
Ability to work with renders produced beforehand allows you to add visual effects into post-production pipeline.
Due to it's long standing holding as a popular composition software, there's no end of tutorials and plugins available to help you achieve whatever results you desire.
As it's part of the Adobe suite, it receives frequent updates and developer support. Very few bugs/issues.
Ability to work with layers and similarities in workflow with Photoshop and Premiere Pro mean transferable skills. No need to learn whole new workflow.
Even though it seems predominantly 2D, the ability to work within 3D space is incredibly intuitive.
No need to be reliant on asset library within software like with other software. You're able to import any images and video clips from the internet to supplement your cinematic.
Gives as much out as you put in. Always a way to improve on your effects.
Cons
Very expensive option. No ability to access individually, must be purchased as part of the Adobe creative suite which requires monthly, contractual subscription that incurs fees if cancelled before end of term.
Unable to render out standard mp4 files on it's own, requires Premiere Pro support.
Having your effects affect 3D space can be very difficult without several layers of masking, as opposed to actually applying 3D effects within your scene.
Requires buffering time for feedback (quite brief, but definitely slower than the real time render capabilities of other options).
Daunting to new users who don't have previous experience with Adobe suite.
Conclusion
After my extensive workflow experimentation, I've come to the conclusion that I'll be using Unreal Engine's built in facilities for the creation of my visual effects.
Simply having all the tools I need available right there in the software housing my environment is far too convenient to pass up. The workflow for the Unreal suite was far simpler than Embergen due to the issues with exporting & importing. With After Effects, there were too many additional steps needed to produce effects which affect a 3D space given that this is the default output for the Unreal ones.
Embergen's effects were easily the best visually, and After Effects clearly had the simpler workflow. But when you weigh up the pros and cons that I've extensively listed, the choice for me is clear.
I firmly believe that this is the optimal decision for me for the reasons I've listed in this post, and look forward to the creation of my final cinematic.
That brings me to the end of possibly the longest blog post I've written so far. This was incredibly insightful about the production of visual effects, and I really feel I've learned a lot, and thus developed my skillset as a 3D artist. In the next post I'll be implementing my final effects and creating my final cinematic ready for submission.


Comments