Creating the Photogrammetry Meshes
- Mikey Owen
- Oct 31, 2022
- 18 min read

Updated: Nov 15, 2022
Now that I've taken a bunch of photographs and lidar scans on our trip to Winspit Quarry, it's time to convert those all into meshes for clean up and retopologising.
In this post I'd like to breakdown the creation process, starting with the lidar scans, and then detailing the pros and cons of the 3 different photogrammetry softwares I used.
Lidar Scans
It seemed prudent to discuss the lidar scans first as they required the least amount of effort and conversion to produce. There was no experimentation with different softwares here as I only had the one option available.
These were produced on the college's iPad using an application called scaniverse (more details about the app can be found here) which was incredibly simple to use!
Workflow -
The scaniverse workflow was very straight forward. Open the application which takes a direct feed from the iPad's back facing camera, hit scan, select the distance from the subject and off you go! From there you simply hold the iPad up to the subject and wait for diagonal red lines to alter into what you're seeing.
This process is performed by utilizing a capture method called lidar (an acronym for Light Detection and Ranging), where an unseen laser light is emitted from the source (in this case the iPad) and then bounced off the subject back to the emitter. The time it takes for this laser light to complete this bounce is then recorded by the emitter and used to create a distance map, indicating depth by calculating the distance between surfaces. The textures are then recorded by the iPad's camera and, when combined with these distance maps, creates a full 3D scan of the subject.
Honestly this process is fascinating to me, as it's such a pure and simple form of creating 3D scans from real life and, given it's accessibility from being on the latest versions of the iPad and iPhones, it means absolutely anyone could give it a go with professional looking results!
The Scans -
Now that we understand the process of creating lidar scans and it's general workflow, I wanted to display the final results of the 7 scans I took. I've therefore compiled some in-software screenshots below to display them. The scans raw mesh files were all imported in Autodesk Maya to give a fair comparison between them without any altering (the clean-up and retopologising will come at a later stage in this assignment):
Cave Entrance

For the first lidar scan I took I decided to use one of the square entrances to the various caves of the quarry. I'm really impressed with the way this scan turned out, though I have to admit this shows some of the lidar limitations. Some of the textures are quite stretched and there are large holes in surfaces like the ground which, no matter how long the iPad was held to it, the application could not pick it up.
Pillar

I decided to use another one of the large pillars lining the cave as my second scan. The texture stretching I mentioned above is more apparent here, especially at the top of the subject. But I have to admit the way in which lidar captures depth on all the cracks along the rockfaces is very impressive! It's unfortunately recorded a lot of the shadows as baked into the texture maps, though I feel this isn't so much a limitation of lidar as it the fault of the environment the object was in.
Rock Cluster Inside Cave

When I noticed this build up of rocks just inside one of the entrances to the caves, I knew I wanted to use it as a lidar capture. I think the scan has performed really well at capturing the details of so many different rock faces at once, even capturing the pillars in the background and cracks in the ceiling exceptionally well! I do once again have some issues with baked in shadows and stretched textures, but I believe there's a lot of uses for this scan due to the sheer amount of objects captured.
Cave Wall

For this scan I really wanted to test the lidars limitations, seeing if quality would be lost relative to the size of the surface captured. I therefore decided to use the entirety of the wall just inside one of the entrances as a subject. I think the scan has performed exceptionally well here! Some of the textures on the ground do look rather janky, but the actual wall itself is perfect, looking exactly as it did during the day it was captured!
God-Ray Hole

This subject is one I affectionately named the 'god-ray hole'. This is because it was a gap in the wall inside one of the caves that cast some great volumetric rays over the rocks inside. I really wanted to capture this geometry so I could use it to apply a similar effect to my environment for the second Data Capture assignment. Unfortunately, it's these very rays that led to the downfall of this scan, as they've resulted in baked in lighting. I will certainly try my best to clean these up, but I am rather disappointed in the resulting scan. To lidar's credit though, it hasn't affected the depth of the geometry in the slightest, it's all there. So this appears to just be a texture issue which may not be too difficult to amend.
Rock Cluster

After being impressed with the way the scaniverse app had captured the cluster of rocks inside the cave, I decided to test it on some of the boulders outside in the open. This result is unfortunately disappointing due to how may gaps the scan has left, regardless of how the iPad was manipulated. Additionally, the various stones on the ground have no depth to them, looking simply like a flat image plane. However, the larger boulders look perfect, so not all is lost with this scan! It potentially emphasizes how much better lidar performs with large subjects rather than intricate details.
Rock Cluster with Grass

I've never been one for giving up, and decided to use my last remaining lidar scan on another cluster rocks, although this time choosing to focus on a smaller group surrounded by plenty of foliage. My thinking behind this was I wanted to know how well lidar would perform with plants, and wanted to ensure my object was well lit from all angles (given that my scans up to this point had been tucked away in nooks or inside the caves). I have to say this scan has performed much better in terms of the rocks themselves, though I disappointed with how the foliage came out. I distinctly recall while taking this scan that the app struggled to detected smaller objects like blades of grass, and it appears to have bundled them all together into a green 'lump' of geometry. Provided this mesh is not seen from a high quality close-up though, I'll admit this does look quite effective!
This brings us to the end of my lidar scans! It's certainly been a learning experience, and I'm looking forward to seeing how the photogrammetry models stack up! Before doing so however, I wanted to breakdown a pros and cons list of using lidar instead of photogrammetry. This way at the end of this assignment I can draw some conclusions on my personal preferred method of data capture.
Lidar Pros:
Very user friendly - Those who have little to no experience with lidar (like myself) would find this approach very simple. The only requirement being to have a device with the facility available and a single free application.
Instant feedback - As soon as you hit the 'finish' button on the app, the scan is compiled and displayed to you immediately. This allows the user to decide whether they're happy with the mesh there and then, rather than having to run it through photogrammetry software for a lengthy period of time only to discover issues.
Impressive detail on larger subjects - My experiences with lidar have revealed that it excels at capturing large subjects from a variety of distances, capturing all their intricacies in a high level of detail.
Able to select quality of mesh before compiling final result - As anyone with experience in 3D modelling knows, the poly count of a highly detailed object like these scans is crucial. Too low and the object will become a blurry mess, too high and your scene will become poorly optimized, resulting in lag and extended render times. Scaniverse allows the user to select the level of detail they want at the end of the capture process so this count becomes a user selected variable rather than a default.
Lidar Cons:
Unable to add additional areas of scan without starting over - Unfortunately if you discover after completing a scan that there's some large holes in parts of the object you missed, you're unable to just add this in. You must in fact start the scan over (which happened to me in a few instances).
Texture stretching - While the real time feedback of the scans is incredibly useful (changing the diagonal red lines to a clear image), I found that quite often an area would like complete, but the resulting scan would actually have incredibly stretched textures. This may be due to moving the iPad across a surface too quickly, resulting in motion blur, but the app does not provide this feedback until it's too late.
Foliage issues - The scan unfortunately doesn't cope with foliage or small details very well. I appreciate this is probably a technological limitation as these details are so minute, but it is rather disappointing and may work a lot better on other photogrammetry options.
Baked in shadows & lighting - Whilst I feel this is a common issue with all forms of photogrammetry, it's still worth noting the issues it can cause. This would potentially be fixed by ensuring your object is lit flatly, but the scans seemed to struggle with it far more than other photogrammetry options.
Photogrammetry
Now that we've experimented with lidar scans, we can move onto photogrammetry itself. There's a few things to discuss here before I demonstrate my scans.
I wanted to experiment with a variety of software options, so selected 3 based on my tutor's recommendations: Meshroom, Autodesk ReCap & 3DF Zephyr. I'll explain the workflow and pros & cons of these options further down this post, just as I did with the lidar scans.
Additionally, I had 9 subject scans from my photos; 5 taken with my phone's camera, and 4 with the DSLR cameras. Too compare these all individually across all 3 software options (and in turn to test different retopology and clean-up methods on them all in the next post) would be far too time consuming. I've therefore selected 5 captures total to use as comparisons, which you may recall from the previous post on the Quarry trip:
DSLR captures: Simple Rock & Mossy Cliff Face.
Phone captures: Campfire, Pillar & Cracked Rock.
These captures should provide a wide range of subjects; the large scale of the mossy cliff face, photo count of the campfire, lack of lighting on the pillar, crack depth on the cracked rock and of course the simplicity of the 'simple rock' will provide great comparables. With that out of the way, we'll move onto our first option for photogrammetry software.
Meshroom
I've touched on Meshroom in previous posts, highlighting it as easy to use and the choice favoured by my college, but here I'd like to break it down in a lot more detail. As a reminder, Meshroom is a freed executable file based option for photogrammetry, distributed by AliceVision (more information is available from this link here).
Workflow -
As I've mentioned in previous posts, the workflow for Meshroom is incredibly straight forward and user friendly. Upon opening the application for the first time, you're greeted by a very simple and straight-forward interface. From there it's simply a case of dragging & dropping your subject photos into the box on the left of the screen, clicking the green 'start' button and waiting for the processes to complete.
Of course more options are available for those who look for them. The basic graph editor is all node based, and cycling through the different nodes allows the user to add certain constraints like number of cameras, texture size and file output type, unwrap methods and even an option to 'fill the holes' in the meshes.
The Scans -
Rather than breakdown the scans individually as I did with the lidars, it seemed better to simply display my chosen 5 captures as one single gallery and talk about them as a collective for each software option. To that end, please find below a gallery of the 5 scans from Meshroom as they appear in a Maya viewport (again for consistencies sake):


Right off the bat the differences between the lidar scans and photogrammetry are apparent. Photogrammetry works much better on a smaller scale, with the obvious issues being on the scan for the mossy cliff face, and the ground terrain across all the scans being much detailed! Meshroom itself has done a great job picking up on the details on all the rock faces, and the foliage additionally is much clearer in these scans than the lidar ones.
I'd now like to breakdown the pros & cons of Meshrooms according to my findings with these scans:
Meshroom Pros:
The application is free - While this might not be a deal-breaker for companies looking for high quality scans, for a student like myself this is a God send. AliceVision offer up Meshroom free of charge for anyone interested in photogrammetry.
The application is delivered as an executable file - Again, this may not be important to most people, but not having to install software and instead simply run an executable file is a huge plus to me. It prevents the software from being too invasive, and means you can get started with photogrammetry quickly.
Simplistic user interface - As someone who's dabbled in all sorts of applications over the last 2 and a bit years, I know better than most how off-putting a confusing UI can be. Meshroom thankfully is very simple, with clear labels for all options and built in tutorials, it was incredibly easy to get started.
Deeper customization than originally anticipated - For the purposes of this section of the blog, I explored the nodes Meshroom uses for it's processes more so than I had previously. I was surprised at how flexible the application is for it's simplistic nature, allowing plenty of options for decimating the mesh, altering the size of the texture maps and even filling in the holes on your scans by simply checking a box.
Meshroom Cons:
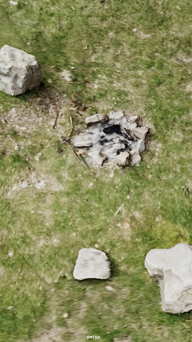
Structure from motion can be inaccurate - Structure from motion is the process Meshroom relies on to create the mesh, and I discovered during this than it can have some wild inaccuracies. For example, on the campfire scan, you'll notice all the holes not far from the subject rocks. These have ended up several meters under the ground in the final scan due to inaccuracies with this process. I'm not sure why it occurs, as it seems to be completely at random.
Foliage issues - Like the lidar scans, Meshroom also has issues with 'clumping up' objects like grass and plants. I appreciate that this is most likely due to technological limitations, but I'm still disappointed that software specializing in capturing high detail on small scale objects has failed in this way.
Texture stretching - This could be down to the photos used to capture the subject, but other software I've detailed below that used the same captures would say otherwise. It's admittedly not often, but a lot of the textures do end up being stretched and blurred over 'busy' surfaces.
Struggles with larger scans - Where the lidar scans seem to perform better on a larger scale, Meshroom appears to be the opposite. The mossy cliff face subject in particular is the real disappointment. Considering Meshroom's placement of the cameras in the real time feedback covered all bases, it has a lot of geometry missing and seems to fail at capturing the intricate details of the subject from further away.
Autodesk ReCap
ReCap is the name of the second software I decided to use, and it's part of the autodesk package (more details on the software can be found here).
I have experience with Autodesk software, using a lot of 3DS Max and Maya to create my projects over the last two years, so I'm hoping this experience will translate into a basic understanding of how to use ReCap.
Workflow -
ReCap was a completely different beast in terms of workflow, especially after the straightforward approach of Meshroom. After installing the software, I quickly discovered that everything it did was entirely cloud based. A new project must be opened, from there you must select the 'object from photos' option and import your photos.
Here is where the workflow issues began, because I needed to install a further application from here called Autodesk Desktop Connector. This application is rather invasive, acting as a constant licence checker, but is also required for connection to the Autodesk cloud servers which is where ReCap insists on storing your photos and converting them to models. After uploading my photos, I had to wait on the software uploading them to the cloud, and then processing the models which took a substantial amount of time compared to Meshroom.
The Scans -
Once the processing for my 5 captures was finally completed, I was then able to view the models. I've included a gallery below of the meshes generated by ReCap in an Autodesk Maya viewport again for consistency:


Well, on first impression these are quite disappointing, especially after the time taken within ReCap to actually produce them. There's a horrible blurred look to near enough all of them, though I believe this may be in part due to the complexity of the textures as, when displayed in a Maya viewport, if they're a particularly high resolution this can sometimes happen (as I learned in my project last year). Unfortunately as a far comparison I'll have to take them as they are. The colours are certainly more vibrant though, and ReCap did a great job and picking up much more of the environment than Meshroom. You can certainly see there are far less holes.
As I did with Meshroom, I'd now like to breakdown the pros and cons of ReCap as a photogrammetry software option:
ReCap Pros:
ReCap's auto-crop option - As this point would imply, ReCap does have a built in 'auto-crop' feature which you can select before the mesh is generated. I have tested it and can say with confidence that it's fairly impressive! However I'd consider this to be a plus for model clean up so will discuss this more in the next post.
You can set multiple scans going at once - As ReCap is cloud based, you can set multiple sets of photos uploading and models processing at once, rather than the other softwares where you must wait for one to be completed before moving onto the next.
Built in decimation and slice tools - If you prefer to go manual with the clean up of the mesh, ReCap does have built in tools for both slicing away unwanted parts of the model and decimation for retopologising the model (again more on this in the next post).
You can adjust units and rescale the mesh before exporting - Similar to the point above, you're able to manually adjust the scale of the mesh to a life-size equivalent before exporting the mesh. With Meshroom you would have to take it to another 3D software program in order to scale it up.
Optimized export settings - ReCap allows you to choose from a wide variety of 3D software applications to optimize the mesh for prior to exporting; Max and Maya being two of the many options available. This ensures when the mesh is brought into your 3D software of choice that all the textures and geometry are set our correctly, and any unnecessary conversion is avoided.
ReCap Cons:
Complicated installation - Unlike Meshroom which is a single download and running of an executable file, ReCap is the complete other end of the spectrum. You must first install the desktop connector, as well as ReCap Photo, before you can even begin a project. This also is not explained to you on the software itself, and you must go searching for others with similar issues to understand the problem.
It's expensive - Unlike Meshroom which is completely free, ReCap costs either £48 per month or £390 per annum for a full licence. I was lucky to only need this software in the short term as a free trial is available, but this is a hefty commitment for software with free alternatives.
Very slow - This may be due to it's cloud based nature, but I would find that Meshroom could complete a scan in under 30 minutes, whereas ReCap took a total of 9 hours for the upload and processing of 5 models.
Dependent on internet speed - Again this is due to it's cloud based setup, and some could see this as a plus, but I have a high performance PC with an average (at best) internet speed. This means if the software allowed me to process the scans on my own hardware, I have no doubt it would have been much faster than this inconvenient upload process.
Capped at 100 photos - Admittedly, this was only an issue on one occasion due to the campfire scan having 101 photos, but this still could be a deal breaker to some. Especially given that Meshroom (and the Zephyr for that matter) have no such limitations.
3DF Zephyr
The final piece of photogrammetry software I decided to use is called Zephyr, produced by a software company called 3D Flow (more details can be found here).
This software was the outlier in this trio as Meshroom is the one we use at college and ReCap is part of the Autodesk suite which I have experience with. This means I am going into Zephyr completely blind.
Workflow -
At first glance, Zephyr is frankly quite overwhelming. It clearly has the most complicated UI of the three softwares, and doesn't give any indication of how to go about using it. Even the 'new project' button is located in a different drop down to the file menu. However, once I'd watched a few tutorials online regarding it, I believe I've got the hang of it (mostly).
To start a new workflow; you must actually use the workflow drop-down menu (shocking I know) to select new project. From there you're greeted with a variety of options to customize the type of scan and allow Zephyr to prepare some presents for you. This includes things like 'Urban', which is set for scans of buildings or other urban structures, or 'Vertical ' for tall objects etc.
Once you've selected from these presents, you import the photos and click the run button. This will quickly generate a basic point cloud version of the mesh, using the camera angles it's detected as a base. From here you must go back to the workflow menu and select 'Dense Point Cloud Generation' from the advanced settings and run this function. This basically builds the mesh out from those point clouds to give it some density.
Then you must go back to the save advanced workflow menu and select 'Mesh Extraction'. This will then finally compute the mesh based around the dense point cloud generated in the previous step. However this is till not the last step.
Finally, you must go to the same menu once again and choose Textured Mesh Generation. This will then generate the mesh with the textures applied before it can be exported to your 3D software of choice.
The Scans -
Now that the scans had been created in Zephyr, I could export them using a variety of presets and custom options into my software of choice. For this I chose Autodesk Maya once again to keep the comparisons fair, and have included a gallery of screenshots from the viewport below:


Honestly, these may be my favourites so far. The colours may be more muted compared to ReCap, but they somehow appear more real this way. Additionally, the level of detail captured on the scans is striking, especially when it comes to foliage, which was a common complaint I had with the other softwares. These may have taken a very long time to produce, and a few headaches while dealing with Zephyr's complex workflow, but I do believe the result has been worth it.
As I've done with the previous softwares, I'd now like to breakdown the pros and cons of 3DF Zephyr:
Zephyr Pros:
More options for capture data - Zephyr features so many options for how you can present footage for it to calculate a mesh from; panorama shots, video clips, drone footage etc. It's very impressive the level of presets it has on show.
Custom settings for wide variety of subjects - Zephyr also features plenty of presets for the type of subject you want to scan; terrain, aerial, vertical etc. This is great for preparing the software for the type of capture you'll be presenting so it can generate dimensions well in advance.
You can 'fill holes' in the software - This is a really useful feature that I'm surprised all 3 of my software options didn't include. Zephyr allows you to manually outline holes in your mesh (i.e. areas you couldn't get to to photograph, like the underside of a rock) and fill them in with a flat plane.
You can customise every aspect of the exported mesh - This includes file formats obviously, but also texture map formats, texture size, remeshing the model prior to export etc. It's very intuitive and allows a high level of mesh optimization before it ever leaves Zephyr.
You can manipulate the mesh in Zephyr - For the mossy cliff face scan, I often faced the issue of the mesh being generated backwards, or upside-down. When then taking it into Maya for a screenshot, especially if it was a complex mesh, having to wait for the software to buffer so I could simply rotate the object was a huge pain. Zephyr allows you to change the orientation of the mesh in house before exporting. As well as scaling it in a similar way to ReCap.
It's relatively cheap - Even though it's not completely free like Meshroom, it does have a free version. The only downside to this free version is that it's limited to only 50 photos, but a few of these scans I produced had less than that and still turned out great!
It detects the type of camera used - This was a surprising feature, but was still incredibly impressive. When uploading the phone photographs, Zephyr detected it was taken on a Google Pixel 4a, and optimized the photos for that camera. It also did the same with the DSLR photographs and includes hundreds of presets for different cameras.
Zephyr Cons:
Complicated workflow - There's no question about it that Zephyr had the most complex workflow so far. I had to search far and wide for tutorials on how to actually engage with the software, and had to essentially generate the mesh 3 times over per scan. This is a very lengthy process, especially considering Meshroom's one-click-done approach.
Overwhelming UI - Don't get me wrong, I'm sure there's a use for Zephyr's variety of options, but just like with the workflow it can be very overwhelming for a new user.
Background capture data is limited - This is just a strict comparison to ReCap, which captures a tonne of background details. This may not be an issue to some, as for cleaning up the scans this is actually a plus, but if you're trying to capture a large space or object I feel Zephyr would need far more photos than the other options (especially detrimental given the 50 photo limit of the free version).
Muted colours - Zephyr definitely produces much darker textures than the other two software options. I'm not sure if this is a result of the camera presets, or simply just how the software does things, but it should hopefully be a fairly easy fix when editing the texture maps. Either way, it's unfortunate that this isn't something you can control within the software.
Conclusions
With that we've reached the end of my software comparisons. I've created some great scans to be cleaned and retopologised in the next post, but to round off this one I'd like to briefly summarize my findings from dabbling with Meshroom, ReCap and Zephyr.
First off, I feel like 3DF Zephyr came out here as the clear winner. It's wealth of presets and tweaking options is an absolute god send for anyone looking to take photogrammetry seriously. It may be complicated to get your teeth into, but once you understand the workflow you can produce some spectacular results!
Meshroom comes in at a close second. Primarily for being such an easy to use and free option, with a surprising amount of depth for those willing to invest their time into exploring the nodes.
ReCap then comes in last. It's not necessarily a bad application, and the autocrop feature is fantastic (more on this in the next post). But it's such a time consuming application to use, and seems to fight you every step of the way. The scans produced as well, regardless of their optimization settings, just don't seem to transfer well at all to other applications, which of course is crucial in the CGI world.
There we have it! I've compared some software options and obtained some great scans. Time to clean them and retopologise them in the next post ready for my 2nd data capture assignment!


Comments