Trip to Winspit Quarry
- Mikey Owen
- Oct 28, 2022
- 5 min read

As part of our Data Capture module, our course group took a trip to Winspit Quarry in the cliffs of Worth Matravers in the Isle of Purbeck.

The aim of the trip was to capture photogrammetry subjects to be cleaned-up and retopologised as part of our first assignment, then placed into a scene to cover the brief for the second assignment (more on that in a future post).
We got incredibly lucky with the weather for the majority of the day, with grey cloudy skies which, as I mentioned in the previous post, is ideal conditions for capturing photogrammetry objects! The terrain itself was also full of varied rock formations (due to it being a quarry which ceased stone extraction in the 40s) so I managed to take some great photos!
Quarry Vlog
As well as taking pictures and scans for photogrammetry, I did manage to record a few videos of the terrain on my phone for the purposes of making a short vlog for this post.
I've edited this short video together along with some light commentary about the trip and history of the quarry. It's included below for your reference:
The trip was incredibly insightful, and I feel in a much better position now to complete the remainder of the assignment criteria with this knowledge under my belt!
Object Captures
I used 3 different capture methods for my chosen objects at the quarry: lidar scans, captures with phone (Google Pixel 4a) and a DSLR camera.
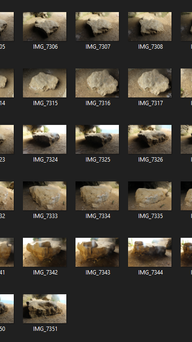
As the lidar scans are already in 3D mesh form, I'll save those for the next post where I discuss the final results, but I wanted to include galleries of the captures as part of this post so that you can see the source material when we come to discuss the resulting meshes.
I'll begin with captures taken with the camera on my phone below:
Mossy Rock


I saw this rock up against a cliff face tucked away off the main path and knew it would be a great subject. Not just because of it's unique shape, but the surrounding terrain and foliage growing on the rock will allow this asset to fit nicely within a scene without too much additional work needed to blend it in with it's surroundings. This gallery features a wide variety of angles of the rock, totally 54 photos.
Cracked Rock


I chose this rock as a subject due to the large crack running across it. I wanted to experiment with how well photogrammetry software would interpret depth and this seemed like a great choice for it! Additionally, just like the rock above, the surrounding terrain of this object (if captured correctly) will do great for blending the resulting mesh into a scene with minimal adjustment required. The gallery in total is 86 photos.
Pillar


The caves at Winspit were full of some wondrous pillars across the wide open chambers so I knew I wanted to capture at least one of these as a photogrammetry subject. The pillars unfortunately had been defaced, but I decided to use this an opportunity to see how well photogrammetry software could pick up textures on objects, in this case the graffiti. The full gallery totaled 51 photographs.
Campfire


When I noticed this abandoned campfire, I knew it would make a brilliant photogrammetry subject. The campfire itself is a unique asset as obviously it differed to the various rocks around the site, and because it was surrounded by small rocks that I'd imagine were used as seating, it allowed me an opportunity to try and capture several subjects at once. The total image gallery is 101 photos, as I wanted to try and obtain as much detail as possible on all the individual rocks.
Brickwork


The final subject I decided to capture with my phone camera before moving onto using the DSLR was this brickwork rubble. I was keen to try out as many different surfaces as possible with photogrammetry, and this brickwork allowed another unique opportunity to see how the software would deal with the patterns and depth of the object. The full image gallery totals 62 items.
That brings an end to the captures made with my mobile phone. I'd now like to discuss the captures I took with the college's DSLR camera, but feel I need to make some observations here rather than pointing them out for each object.
The DSLR unfortunately had a dirty lens, something which I didn't notice until reviewing the photos after trip. Whether this was caused by me accidentally smudging the lens with my thumb, or I was simply unlucky when the DSLRs were being handed out, I just want you to be aware of this in case it causes issues with the scans in the next post. Additionally, the sun decided to come out (typical England) which could potentially result in some shadows being baked into the textures for the geometry. Regardless, the captures are detailed in the galleries below:
Carved Face

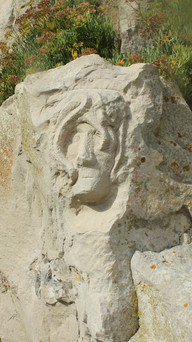


I feel the reasons for wanting to capture this object are fairly obvious. It was an incredibly unique opportunity to really test photogrammetry and see how well it would capture the details of this carved face. With regards to the DSLR camera this is also where I started to capture objects where I was unable to get a full 360 degrees of vision as, obviously, it's carved into a rock and I'm unable to get behind that without taking photos for several miles. The full gallery totaled only 30 photographs because of this, but I'm hopeful for the final result.
Mossy Cliff Face


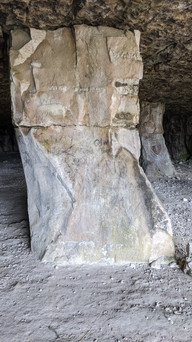
My approach with this subject was that everything I'd chosen up until this point had been rather small, and I wanted to try and capture a bigger object to see how photogrammetry performs on a larger scale. Before beginning the captures, I decided to ask my tutor for guidance who provided some valuable insight onto how I could change my capture method for a better result. He first off suggested using the camera in portrait profile to capture more vertical terrain in the images without having to stand too far away. Additionally he suggested I remain stationary every 5 rotational shots or so, and then pan the camera over to the left for several shots to capture the remainder of the cliff face. Hopefully this technique has resulted in a high quality model as I really love how the grassy mound with the foliage growing up the cliff face looks! The full image gallery totals 62 photographs.
Rock at the Entrance

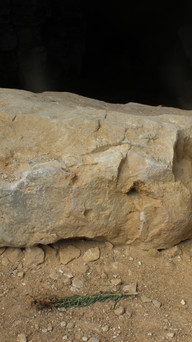


Here is where we get back into familiar territory and have another rock on it's own. I chose this one however because it was just inside the entrance to one of the caves, so clearly there's more light affecting one side of the subject than the other. I wanted to see how well the photogrammetry software could cope with baked in shadows as prior research had lead me to believe that some were better than others for removing this. Unfortunately these images though are where the lens smudge mentioned at the start of this section are most apparent. I hope this won't have any negative effects on the final result. The full gallery for this subject totals 49 photographs.
Simple Rock


Now this rock on the surface appears very basic compared to other choices (it's even named here as such), but there is a method to the madness. Because I wanted to compare various types of photogrammetry software in the next post of this assignment, I decided to make my last capture of the day as basic as possible. This way the captures will (hopefully) not be the issue, and will allow me to make a true side by side comparison for the different software options. Additionally, the grass around this rock is particularly thick! So I am interested to see how well the foliage will be constructed when it's center frame and close up as it is in these captures.
There we have it! That brings us to the end of my photogrammetry capture experiences at Winspit Quarry.
I'll now move onto the results of uploading these photos into various photogrammetry softwares in the next post, as well as examining the lidar scans I also took at this location!


Comments